Oven Grilled “Sotong” (Squid)

oven grilled "sotong" (squid)

oven grilled “sotong” (squid)

I always enjoyed ika sugatayaki (grilled whole squid) at Japanese Izakaya  – 居酒屋 (though since I do not drink much I seldom visit Izakaya c/w very many other styles of Japanese food which I love).

I was trying to find out how to do this as squid has lots of water & you end up steaming the squid instead of grilling. One way I can see is cutting the whole squid in 1/2 rings, then the water will be drained & the oven will grill & NOT just boil or bake the squid. I found a very nice Izakaya picture here.

I also found a simple way of cutting the 1/2 rings. It is described here in Jamie Oliver’s recipe. You insert a knife flat into a large (250g) squid, then using another knife you cut the squid as if you are cutting it into rings. the knife stop at the surface flat of the inserted knife so you get your 1/2 rings. This way it is also easy to wash & remove the insides of the squid.

oven grilled "sotong" (squid)

oven grilled “sotong” (squid)

I then line a baking tray with aluminium foil, place the dry squid & head (air-dry in fridge OR with kitchen towels) on it, sprinkle ground sea salt & coarse black pepper, & drizzle lime juice, olive oil & 1 teaspoon of light soy sauce. I place the baking tray in a preheated 210degC oven turned to the grill function for 10minutes, remove the squid and spooned out the sauce to a small bowl. I turn the squid over and return to the oven for another 8 minutes. Then I transfer to a serving board, and serve with the sauce as dip (as in the picture above).

c.h.e.f andy

Spicy Vongole Fettucine with White Wine

Image

spicy vongole fettucine with white wine

I bought “la la” (littleneck clams – see here for interesting write-up about littleneck, topneck clams etc) from Sheng Shiong today. I have never cooked vongole before but since I do pretty ok in the pasta department, I thought I give it a go. Here comes my first vongole! 🙂

There’s only my eldest daughter Su Min at home for dinner, so I cooked just enough vongole fettucine for 2 of us, PLUS trying out a grilled sotong (squid) recipe.

My preferred pasta is spaghetti but since there is an opened yet unfinished packet of fettucine, I used that instead.  I did the usual browning of peeled garlic cloves in olive oil over low fire and soaked in the aroma. I then emptied the olive oil & browned garlic into a bowl. I added some salt & oil to water in a sauce pan and bring it to boil and put a bunch of (say 200g) fettucine in the boiling water for 11 minutes according to the timing instructions. I tested the texture to make sure it is just al dente & transferred the fettucine to a colander & set aside. In the pan still greased with olive oil I added 15g butter & threw in cut chilli padi & cut spring onions (green onions). I transferred the bowl of olive oil with browned garlic back into the pan. I then turned the fire high & put in the clams. Next I added 1.5 cups of white wine & 1 teaspoon sugar, cover the pan & let it reduced for few minutes. The clams opened up when cooked. I added the fettucine, turned off the fire, tossed and added sea salt to taste.

Image

spicy vongole fettucine with white wine

The shellfish broth, sweetness of the white wine, fragrance of garlic & olive oil, & the spicy kick from the chilli padi all combined very nicely to make this a very tasty dish.

c.h.e.f andy

Ingredients:

  • 200g fettucine (or liguine or spaghetti)
  • 700g littleneck clams
  • 15g butter
  • 3 stalks spring onions chopped
  • 1-2 chilli padi
  • 4 tbsp olive oil
  • 1 whole bulb of peeled garlic cloves
  • 1.5 cups white wine
  • 1 tsp sugar OR to taste
  • sea salt to taste

Directions:

  • Prepare the pasta – add salt & oil to water in a saucepan & bring to boil. add fettucine and boil according to timing instructions. test to make sure the pasta is just al dente & empty into colander & set aside.
  • Cook the vongole pasta – brown whole bulb of peeled garlic cloves in olive oil in a pan over low heat. empty oil & garlic into a bowl. add butter to the pan & throw in cut spring onions & cut chilli padi. add the clams, turn up the fire, add the white wine & sugar, cover while the clams cook. The clams will open up when cooked. add in the fettucine, turn off the fire, toss & add sea salt to taste. serve.

Skin-on Pan-roasted Brined Duck Breast

pan-roasted brined duck breast with wingstick

pan-roasted brined duck breast with wingstick

My success in brining chicken & the pan-roasted brined chicken breast recipe did much to encourage me. 🙂 Also, one friend. in particular, has been egging me to make duck a l’orange but I was NOT excited over a nice orange sauce but not-so-great duck breast as the main fare!

So I thought I should at least try brining duck since it works so well on chicken. And my, my, did it work well! My daughter Su Lin just loves the duck breast. It is moist, tender and tasty from the brining and the slow cooking.

skin-on pan-roasted brined duck breast

skin-on pan-roasted brined duck breast

First, I brine the duck breast & drumstick in 1 litre water with 3 tablespoon salt, 2 tablespoon sugar and 5 limes (squeezed) for 24 hrs. I then wash thoroughly in slow running water, and place them on a rack & air-dry for 24hrs in the fridge (you can just use a kitchen tower to dry them instead). Before cooking, I take the duck out of the fridge for at east 1/2hr to get it to room temperature. I then place them on a cold non-stick pan & turn on the fire to low, and leave w/o turning for 10 minutes. This will render out the fat & make the skin crispy (as in the 2 pictures above). 🙂 I then turn over the duck, spoon out the fat, and then turn off the fire.

skin-on pan-roasted brined duck drumstick

skin-on pan-roasted brined duck drumstick

I was experimenting with 2 different cooking methods so I kept the duck breast in the oven-proof pan & removed the duck drumstick & put it is a separate baking dish.

  1. For the duck drumstick, I tried the pan-roasted brined chicken recipe & place the duck skin-down on the baking dish and place it in the oven preheated to 250degC for 10minutes. I then remove it from the baking dish, let it rest on a serving board, and then carve & serve. It was very good BUT the slow-cooked duck breast which came after was even better!
  2. For the duck breast, I tried Foodwishes.com chef John’s prime rib method (on the duck instead of prime rib). estimating my duck drumstick to be <400g, I did 4minutes on 250degC, left the duck in the oven w/o opening the oven door, and set the timer to 45minutes. there was no need to rest the duck as it had already been rested for 45minutes, and voila! this was easily 1 of the best duck breast I had, even when c/w good restaurants.

c.h.e.f andy

Ingredients:

  • 2xduck breasts with wingstick (I use a 1.9kg to 2.1kg duck from Shop n Save or Giant Hyspermarket)
  • 1 litre water
  • 5% salt (about 50g)
  • 3% sugar (about 30g)
  • 5 limes (or about 30ml bottled lime juice)

Directions:

  1. Preparing the duck breasts with wingstick – use kitchen scissors to cut chicken in 1/2, then cut around the drumstick into 1/4 (breast with wingstick & drumstick quarters) – use a heavy knife or chopper if required,  then cut away & remove the bones under the breast completely, then cut away the fat, wash & clean.
  2. Brining – add 1 litre water in a large plastic container, mix in about 3 heap tablespoon salt & 2 heap tablespoon sugar & stir to dissolve, then pour in 30ml bottled lime juice or squeeze juice from about 5 limes. Put 2x cleaned duck breasts with wingstick into the container and place container in fridge for 24hours. Remove & wash duck breasts thoroughly in slow running water & place on a rack to air-dry in fridge for 24hrs (can also skip this step & dry with kitchen towels)
  3. Cooking – Remove duck breasts from fridge & leave it at room temperature for at least 1/2hr. Place the duck breasts skin-down in a COLD oven-proof non-stick pan. turn the fire on and to low & fry for 10minutes to render out the fat and get a crispy skin. The oil will sputter a bit, turn to low heat after 1 minute. Preheat oven to 250degC. Place oven-proof pan in oven & let the duck cook for 4minutes. Leave the duck in the oven w/o opening the oven door and set the timer to 45minutes and let the duck slow-cook in the residual heat. Remove duck from oven & serve.

Duck in Orange Sauce

Image

2 of my friends who joined me a few times for dinner do not take beef, so I was seeking couple stand-in dishes like pan seared hokkaido scallops (which I didn’t do well previously because I had then no notion yet of the simple logic of a very hot non-stick pan & bone dry scallops), and GR (Gordon Ramsay) crispy salmon which I do rather well. And so I googled and found this videojug’s Duck in Orange Sauce recipe.

This recipe is good for making the orange sauce. For better instructions on panfrying the duck, I prefer Gordon Ramsay’s cold pan method to render out the fat & produce a crispy skin.  The recipe worked well enough for my first try as you can see in the above picture. However I do not find the breast tender enough and thought that slow braising in the orange sauce or in the oven may work better.

Well, slow braising didn’t work well enough, and the slow cooking in the oven also did not work too well until I apply/vary the pan-roasted chicken method on brined duck drumstick, and also adapted/tested out Foodwishes.com chef John’s prime rib method on the brined duck breast. Both these latter 2 methods produced very nice duck drumstick & duck breast, with the prime rib method on brined duck breast producing a very tender, moist & tasty duck breast which can be serve as a standalone tapas OR serve as a main course drizzled with the orange sauce. see here.

c.h.e.f andy

Ingredients:

  • 2 duck breasts (the duck size I use is a smallish 1.9kg to 2.1kg for a whole duck)
  • sea salt & coarse black pepper
  • 2 tbsp light soy sauce
  • 150ml fresh orange juice
  • 1 cup wine
  • 1 cup chicken stock
  • zest from 1 orange
  • 2 tbsp sugar

Directions;

  1. combine the orange juice, zest, wine & chicken stock in a saucepan. heat & reduce and set aside.
  2. lightly season the duck breast with sea salt & coarse black pepper (now I use the brined duck method which have the duck breasts brined in 1 litre water with 5% salt & 3% sugar for 24hrs, so I do not season before putting to the pan).
  3. place the duck breasts in a cold pan & turn on the fire & to low. allow the fat to be slowly rendered out and leave for 10mins w/o turning to get a crispy skin(watch Gordon Ramsay’s video on how to do this). turn over the duck, spoon out the duck fat and add 2 tablespoon of soy sauce. turn off the fire.
  4. using Foodwishes.com chef John’s prime rib method, I preheat oven to 250degC, then turn over the duck back to skin-down on the oven-proof pan & place it in the oven for 4minutes! leave the duck breast in the oven w/o opening the oven door & turn the timer to 45mins to let the residual heat can slow cook the duck. After 45 minutes remove the duck from the oven, rest & serve standalone as a tapas OR as a main course drizzled with orange sauce. see here.

Nonya Curry Chicken

nonya curry chicken

nonya curry chicken

I just love the nasi padang dishes from Nasi Padang River Valley located at Zion Road. There was a time we even used to lug too many takeaway items for small home gatherings, asked for lots of curry sauce and reused later by adding our own chicken from the supermarket. That was a time when calories & cholesterol did not enter the calculations.

Image

nonya curry chicken

Anyway I didn’t think I could cook curries or had any interest to, until I came across this nonya curry chicken recipe & decided to just give it a try – WTH right?

Blessed with beginner’s luck, I got it right the first time, and was able to repeat with no difficulty the second try. I still don’t cook this often, but I have done it 2 more times for the 23pax buffet on 26nov2012 & just before that a 10pax sit-down dinner on 5nov2012, and all were great & I just love the lemak & herb taste. I would be quite happy to cook this again when I need. 🙂

First I stir-fry star anise, cinnamon stick & cloves over low heat. I then add in the spice paste (ground garlic, shallots, chilli padi, coriander seeds, cumin, fennel) and stir-fry till fragrant. then in goes the curry leaves and cut chicken pieces and fry them really well. I then add water, cover with lid, and braise over low heat for 40minutes OR until chicken is cooked. After 10mins, I use a pair of tongs to pick out the chicken breasts & place them on top of the thighs, wings, drumsticks and pieces with bones so they won’t be overcooked and remain tender & juicy. 🙂 Finally I add about 100ml coconut for the lemak taste I like & a teaspoon of tumeric to give it the nice golden yellow colour. how pretty! 🙂

nonya curry chicken

nonya curry chicken

nonya curry chicken

nonya curry chicken

I then add sea salt and sugar to taste and serve.

c.h.e.f andy

Ingredients:

  • 1 whole chicken (I use 1.4kg from Giant hypermarket OR Sheng Shiong) – cut off head, neck, feet & cut into 2in pieces
  • 100ml – 150ml thick coconut milk or to taste
  • 2 star anise
  • 1 clove
  • 1 cinnamon stick
  • 4 tbsp oil
  • 1 tbsp sea salt
  • 1 tbsp sugar

for spice paste (ground – in my case I mince & pound them):

  • 3 cloves garlic
  • 10 shallots
  • 2 chilli padi
  • 10g coriander seeds
  • 1 tsp fennel
  • 2 tsp cumin
  • 1 tsp tumeric powder

Directions:

  1. Prepare the chicken – with a pair of kitchen scissors, cut off the head and feet. cut the body in 1/2 & the cut out the drumstick, thighs & wings along the joints. chopped the breasts & remaining portions into 2 in pieces.
  2. Cook the chicken curry – stir-fry star anise, cinnamon stick & cloves over low heat. add in the spice paste and stir-fry till fragrant. add the curry leaves and cut chicken pieces and fry them really well. add water, cover with lid, and braise over low heat for 40minutes OR until chicken is cooked.
  3. after 10mins, use a pair of tongs to pick out the chicken breasts & rest them above the curry liquid on pieces with bones etc so they won’t be overcooked and remain tender & juicy. add about 100ml coconut for the lemak taste & a teaspoon tumeric powder for the colour. add salt & sugar to taste. serve.


Teochew Braised Duck


teochew braised duck

teochew braised duck

teochew briased duck

teochew briased duck

Now for some Asian cuisine.

Being Teochew (a dialect group from South China at the eastern side of Guangdong province), I am of course a fan of Teochew braised goose (潮州鲁鹅). Unlike Hong Kong, we don’t get much of goose in Singapore, so we settle for the second best aka braised duck. Like the popular Hainanese chicken rice, though perhaps a distant second, braised duck rice is available in hawker centre & food courts all over Singapore & quite cheaply, so there is not that much motivation really (according to my “worthwhile to do or not” philosophy) to attempt Hainanese chicken rice or teochew braised duck unless I can do this easily and produce something of equal or better standard than most I can get easily & cheaply outside.

Well, I have NOT found it yet for chicken rice, BUT I might just have got it for my braised duck!

Tai Wah chicken marinate (大华鲁鸡汁)

Tai Wah chicken marinate (大华鲁鸡汁)

This really a very simple recipe, as all I am doing is like using Tai Wah chicken marinate (大华鲁鸡汁) I bought for S$2.60 at Giant hypermarket, add an entire bulb of peeled garlic cloves (for 1/2 a duck – you can of course use the whole duck if you like, for me I only do 1/duck as my family cannot finish 1 duck & my group dinners include many other dishes so I also do not want to cook 1 whole duck which I did only on the occasion of the 22pax home buffet on 5.5.2013 and 27pax 11-course home buffet on 7.11.2013), cinnamon sticks, star anise and bay leaves, and braise for 1 hour. voila!

20130301_150335

Teochew braised duck

teochew braised duck

teochew braised duck

Not much of a recipe really, but my cooking philosophy is always driven by taste (& of course texture & colour, presentation – in Chinese we say 色香味OR colour, fragrance & taste) – so I am no stickler to whether to cook something with herbs from scratch like I do for nonya curry chicken OR to use a premix as I do often for my favourite, favourite dish – bakuteh (肉骨茶). So long as my diners and I like it, and it is easy to make & repeatable, I am all for it irrespective whether it is done from scratch or with premix! 🙂

One thing I am clearly NOT good at is deboning the duck, as seen in the picture of the largely mutilated carcase below. 🙂

teochew braised duck deboned

teochew braised duck deboned

c.h.e.f andy

Ingredients:

  • 1/2 duck (about 1.9kg to 2.1kg for whole duck size)
  • 1 cup Tai Wah braised chicken marinate
  • 1.5 – 2 tbsp of sugar
  • 1 whole bulb of peeled garlic cloves
  • 2 cinnamon sticks
  • 2 star anise
  • 1 bay leaf

Directions:

  1. Prepare the duck –  use kitchen scissors to cut off the neck & the feet. cut through the body in 1/2. use a heavy knife or chopper if required. wash, clean & dry with kitchen towels.
  2. Cooking the duck – rub the 1/2 duck with sugar all over the skin side & the inside. In a large wok, stir fry the peeled garlic cloves to brown over low/medium heat, and add star anise, cinnamon sticks & continue to stir-fry until you can feel the aroma. turn to medium & place the duck skin down and using your hands, push the skin onto the wok surface to brown a little for 5 minutes. turn heat to high & add 1 cup of Tai Wah braising sauce and 3 cups of water enough to cover 80% of the 1/2 duck. bring to boil, cover with glass lid & lower fire to minimum and braise for 1 hr. The braising liquid should continue frothing a little & nearly cover the 1/2duck. use a ladle & base the duck with the braising liquid every 15minutes. remove duck from wok & place on a cutting board to rest. empty the sauce (through a strainer if required) into a bowl. lift off the thick layers of oil. The sauce can of course be used to cook eggs & beancurd.
  3. Serving the duck – I debone the duck & place in a serving dish w/o basing the sauce over. I keep the sauce in a bowl next to the serving dish so the dinners can use the sauce as dip if they prefer.

Chilli Crab Spaghetti

Image

chilli crab spaghetti with prawns & crab claws

Like all good Singaporeans, chilli crab is a perennial favourite of mine, and for the past many years, chilli crab has appeared on the fusion pasta menu in some chic restaurants. One of the earliest restaurants that offer fusion pastas must be Wild Rockets, which was serving fusion pastas like laksa pesto many, many years back.

Often enough. after having a feast of chilli crabs, we save some sauce & bring home & toss it with pasta. It is not quite my favourite pasta, but I like it enough to be motivated to try. The most difficult part is the the chilli crab sauce. I googled the recipe, but I am NOT about to buy or cook crabs (something I am not convinced is worthwhile doing as good chilli crab restaurants are everywhere) just to cook a pasta. So I will have to improvise. As my family use a lot of prawns in cooking and have been throwing away the shells for the most part, I thought I can use prawn shell stock (from boiling the prawn shells & heads for 2-3hrs) as a proxy to crab.

Image

chilli crab sauce

I adapted the recipe below for my purpose. The chilli crab sauce involves frying  chopped shallots, ginger, garlic & chilli padi, adding a mixture of ketchup, chilli sauce, oyster sauce, shaoxing wine, vinegar. lime juice, and then adding prawn shell stock. before serving, beat 1 egg & stir in to mix well with the chilli crab sauce. I got it right in my first attempt and am able to reproduce it without difficulty every time.

I add shelled medium prawns with tails on and frozen crab pincer meat from NTUC Fairprice or Sheng Shiong but they are not very satisfactory and can do without (good quality canned crabmeat is very expensive, like S$20 for a 400g can).

c.h.e.f andy

Ingredients:

  • 4 chopped shallots
  • 3 tsp chopped garlic
  • 1 in chopped ginger
  • 4 tbsp ketchup
  • 1 tbsp garlic chilli sauce
  • 1 chilli padi
  • 1 tbsp oyster sauce
  • 1 tbsp flat sugar
  • 1 tbsp shaoxing wine
  • 1 tsp rice vinegar
  • 1 tsplime juice
  • 2 cup prawn stock
  • 1 tbsp cornstarch
  • 1 egg
  • 1/2 cup fresh coriander

Directions:

  1. Prepare the prawn shell stock – boil prawn shells & heads in a large dutch oven for 3 hrs, strain and set aside the stock
  2. Prepare the chilli crab sauce –
    • mix the ketchup, chilli sauce, oyster sauce, shaoxing wine, vinegar. lime juice in a large bowl.
    • finely chopped the shallots, ginger, garlic and chilli padi (or pulse till finely chopped in a food processor).
    • add oil to a large wok over medium heat. and fry the chopped shallots, ginger, garlic & chilli padi for few minutes.
    • stir in the prepared mix from the large bowl, reduce heat and simmer of 3 or 4 minutes.
    • add the prawn shell stock, bring to boil, turn off the fire and set aside to use when required. before use, beat 1 egg and stir in & mix well.
  3. Prepare the spaghetti– add some salt & oil to water and boil the spaghetti according to timing instructions & drain in a colander.
  4. Cook – empty the prepared olive oil & browned garlic into a hot wok. pour the chilli crab sauce into the wok. heat briefly then turn off the fire, add in the spaghetti & toss & add sea salt to taste. Place the spaghetti in a serving dish and garnish with fresh coriander.

Pork Rib Arrabiata Spaghetti

10473_10151224549824494_99976271_n

pork rib arrabiata (spicy tomato) spaghetti

Seafood spaghetti works equally well with arrabiata (spicy tomato) sauce as with alio olio. It is kind of boring though, and personally my preference is the latter.

I tried a pork rib arrabiata at Capri with some friends last October (2012), so I thought I will give that a try. Having found a very easy youtube kakuni recipe to slow braise belly pork which I like very much, I thought I would vary it a little to braise the pork ribs.

seafood arrabiata spaghetti

seafood arrabiata spaghetti

So I follow the kakuni recipe – put the cleaned pork ribs in a pot, add 1 cup of mirin, 1 tablesppon sugar, 2 tablespoon light soy sauce, bring to boil over an induction cooker and braise for 1.5 hr at low heat (100W). I then added canned whole tomatoes which I have diced & also the tomato sauce from the can, and added diced yellow onions. I continue to braise the pork ribs for another 1/2hr by which time the pork is fork tender and falling off the bones.

pork rib arrabiata spaghetti

pork rib arrabiata spaghetti

The same way as I did for alio olio, I return the fragrant olive oil with browned garlic cloves kept aside earlier and fry with chilli padi in a hot wok, then empty the pork ribs with the spicy onions, tomatoes & sauce into the wok, heat briefly, turn off the fire, add the ready spaghetti & toss & add sea salt to taste, and garnish the dish with fresh basil from the garden before serving.

The same recipe works for belly pork (see picture below), which I prefer over the pork ribs.

belly pork arrabiatta spaghetti

belly pork arrabiata spaghetti

c.h.e.f andy

Ingredients:

  1. 250g (1/2 packet) spaghetti (serves 2-3)
  2. 4 tbsp olive oil
  3. 1 bulb garlic peeled & ready in whole cloves
  4. 500g pork ribs in 2 inch cuts
  5. 1 cup mirin
  6. 1 tbsp sugar
  7. 2 tbsp light soy sauce
  8. 1 small yellow onion diced
  9. 1 or 2 chilli padi
  10. sea salt & pepper to taste
  11. 1 cup of washed fresh basil

Directions:

  1. Braising the pork ribs – pour boiling water over the ribs & clean it in cold water. put in pot with 1 cup mirin, 2 cups water, 2 tbsp light soy sauce & 1 tbsp sugar, braise for 1.5hr. add diced canned whole tomatoes & sauce, diced yellow onions, and braise for a further 1/2hr
  2. Prepare the garlic olive oil – stir-fry whole garlic cloves on low heat to brown the garlic & flavour the oil.
  3. Prepare the spaghetti – add some salt & oil to water and boil the spaghetti according to timing instructions & drain in a colander.
  4. Cook – empty the prepared olive oil & browned garlic into a hot wok & add cut chilli padi. pour the  braised pork ribs with the spicy onion & tomatoes & sauce into the wok. heat briefly then turn off the fire, add in the spaghetti & toss & add sea salt to taste. Place the spaghetti in a serving dish and garnish with fresh basil leaves.

Seafood Alio Olio Spaghetti with White Wine

seafood alio olio spaghetti with white wine sauce

seafood alio olio spaghetti with white wine sauce

Starting off with alio olio, I have experimented with different pastas including belly pork arrabiata & chilli crab pasta. This remains firmly my favourite pasta dish though. 🙂

Image

seafood alio olio spaghetti with white wine sauce

The alio olio (garlic olive oil) is a key in this dish. I prepare this first by slowly browning peeled whole garlic cloves from 1 bulb in olive oil on low heat. You can feel the garlic olive oil aroma wafting through the kitchen. I then empty these in a bowl & while the wok is still greased with oil, I lightly fry the sotongs (squids) and small or medium shelled prawns (which have been lightly seasoned with salt & pepper) separately to 90% or just cooked & dish them into separate bowls.

seafood alio olio spaghetti with white wine sauce

seafood alio olio spaghetti with white wine sauce

I then boil the spaghetti (adding some salt & oil to the water) according to the timing instructions given on the package to just before al dente and then transfer them to a colander to drain. The spaghetti is still hot & will get cooked just a little more.

seafood alio olio spaghetti with white wine

seafood alio olio spaghetti with white wine

When I am ready to cook, I heat up the wok & emptied into it the bowl of fragrant olive oil with browned garlic cloves together with cut chilli padi and stirfry to get the aroma out, then add in the squid & prawns. I then turn up the fire & add white wine (up to 1 cup) and 1 teaspoon sugar, and reduced. I then turn off the fire, add in the spaghetti & toss & add sea salt to taste, dish them out on a serving dish & garnish with washed fresh basil from the garden.

c.h.e.f andy

Ingredients:

  1. 250g (1/2 packet) spaghetti (serves 2-3)
  2. 4 tbsp olive oil
  3. 1 bulb garlic peeled & ready in whole cloves
  4. 250g medium or small prawns
  5. 250g aka 1 large s0tong (squid)
  6. 1 or 2 chilli padi
  7. 1 cup white wine
  8. 1 tsp sugar
  9. sea salt & pepper to taste
  10. 1 cup of washed fresh basil

Directions:

  1. Prepare the prawns – shell and butterfly/de-vein the prawns. season lightly with sea salt & pepper
  2. Prepare the squid – remove the head & tentacles & wings & set aside. remove red skin from the squid body & cut into rings. season lightly with sea salt & pepper.
  3. Prepare the garlic olive oil – stir-fry whole garlic cloves on low heat to brown the garlic & flavour the oil.
  4. Prepare the spaghetti – add some salt & oil to water and boil the spaghetti according to timing instructions & drain in a colander.
  5. Cook – lightly fry the prawns & squid separately and set aside. empty the prepared olive oil & garlic into a hot wok & add cut chilli padi. add the prawns & squid. turn up the heat & add the white wine & sugar & reduce. turn off the heat, add in the spaghetti & toss & add sea salt to taste. Place the spaghetti in a serving dish and garnish with fresh basil leaves.

Tagliata di Manzo (Italian Sliced Beef) – Gordon Ramsay’s Pan Grill Method

tagliata di manzo

tagliata di manzo (added on 7.11.2014)

I rarely order steak when I dine out these days (unless it is at some famous grill restaurant or fine dining) as I can buy very good meats at a meat grocer (eg mmmm) & cook them at home easily myself! It seems like steak is the easiest thing to cook when you have a good piece of meat & I sometimes wonder how many restaurants can do it so bad – mostly because done at the wrong temperature!

There seems to be very many approaches to cooking steak. For now, I find the GR (Gordon Ramsay) method of a chargrilled steak suits me fine (Heston Blumenthal use a very different method of flipping the meat every 15 seconds! ).

tagliata di manzo (USA grain fed ribeye & australian wagyu MBS 4/5)

tagliata di manzo (USA grain fed ribeye & australian wagyu MBS 4/5)

pan-fried wagyu marbling score 6/7

pan-fried wagyu marbling score 6/7

Basically you need to have the meat at room temperature (means you take it out of the fridge for at least 1/2hr), lightly season with sea salt & coarse black pepper, grease a very hot skillet (I use the fat cut from the striploin or ribeye to grease the pan), and place the steaks on the the skillet w/o crowding, turn once, lightly touch the meat to feel for done-ness, add a small blob of butter to give it a nut brown finish, base the sauce over & let the steak soak in the flavour. You then turn off the fire & lift the steak off the pan to rest on a serving board & rest for 5minutes or longer to let the meat relax & redistribute the juices (please do see Heston Blumenthal’s very entertaining video here on the human press..lol.,to understand why). 🙂

panfried ribeye using GR (Gordon Ramsay) method

panfried ribeye using GR (Gordon Ramsay) method

The ribeye in the top picture (& in the plated tagliata di manzo below) has been aged in the fridge for 48hrs. Aging is supposed to intensify the flavour & also tenderise the steak. There is a lot of literature on this. For now I do not find significant difference whether the meat is aged for 48hrs or not, and I am happy just having the steak w/o aging. My views may change later though if I know more!

tagliata di manzo

tagliata di manzo (added on 7.11.2014)

tagliata di manzo

tagliata di manzo (added on 7.11.2014)

For the tagliata (Italian sliced beef), we just need to plate it nicely with rockets & 1/2 cherry tomatoes lightly tossed with sea salt, extra virgin olive oil & balsamic vinegar on a serving board, like so below.

c.h.e.f andy

Kakuni – Japanese Slow-Braised Belly Pork

64508_10151202840584494_605730478_n

Kakuni – Japanese braised belly pork in mirin, sugar & soy sauce

This is a very simple kakuni recipe I picked up from youtube.

It is best done with an induction heater (like any slow-cooked braising items) as you can control the heat to the absolute minimum at 100W or 200W and run less risk of boiling off the liquid & getting the dish burnt!

You want to first immerse the belly pork into a pot of boiling water (or pour boiling water over the belly pork), remove it & place in a basin or bowl of cold water and ckean thoroughly; and then cut into 1 inch blocks like in the above picture.

Place the belly pork pieces in a pot over an induction heater (or your usual stove), add in 1 cup of mirin & 2 cups of water (enough to cover the belly pork) – I also add 1 tablespoon of sugar; bring to boil & then turn to low heat for 1hr. Add 1 to 2 tablespoon of soy sauce (to taste) – the soy sauce is added later so the belly pork will retain more moisture -and braise at low heat for another 1 hr, and voila!

c.h.e.f andy

Ingredients:

  • 400g belly pork
  • 1 cup mirin
  • 1 tbsp sugar
  • 2 tbsp light soy sauce

Directions:

  1. Wash belly pork & place in boiling water. remove & place in cold water & clean thoroughly. cut belly pork into 1 inch blocks.
  2. place belly pork pieces in a pot. add 1 cup of mirin, 2 cups of water & 1 tbsp of sugar, enough to cover the belly pork completely.
  3. put the pot on an induction heater (or stove) and bring content to boil. turn to low heat and braise at low heat for 1 hr. add 2 tbsp soy sauce and braise for another 1 hr. Serve.

Garlic Jumbo Prawns

20130128_205227-e1362500772651

garlic jumbo prawns with fish sauce – dry wok, high heat

This recipe kind of self-evolved..

#10 dry wok prawns

dry wok prawns

high heat dry wok garlic prawns

high heat dry wok garlic prawns

The key is dry wok really. First, just like when pan-searing scallops. the prawns should be dry as the wok temperature drops with water & you will end up steaming or poaching the prawns. 🙂

With high heat & a very dry wok, you get barbeque flavour but though the shells maybe sightly burnt, the prawns are baked in their own shells, so the prawns are moist, succulent & sweet.

#9 dry wok king prawns

dry wok king prawns

The fish sauce is another key ingredient. There is a teochew saying brandied by my nephew when I visited Shantou that means “high furnace, hot pan & fragrant fish sauce”. Fish sauce is added only at the end to a very hot wok, aroma filling the air, before dishing the prawns out of the wok & serving.

c.h.e.f andy

Ingredients:

  • 600g large prawns (I have done up to 1.3kg=10 jumbo prawns)
  • 6 cloves of garlic minced
  • 1 or 2 chilli padi (I like the spicy kick)
  • 3 tbsp vegetable oil
  • 3 tbsp fish sauce
  • a large 28cm wok OR if doing 1 kg+ prawns then 30cm/36cm wok

Directions:

  1. Preparing the prawns – cut away the legs, whispers & spears. butterfly & de-vein the prawns. wash & put in a colander to drain & place in the fridge to dry. Take out 1/2hr before cooking so prawns will be at room temperature.
  2. Cooking – stir-fry the minced garlic and chilly padi in the wok on high heat. Add the prawns before the garlic turns black. Continue to stir & turn over the prawns for few minutes on high heat. Turn to low heat & continue to stir & turn over until the prawns start to look opaque, which means they are cooked. Do NOT cover the wok as the condensation will turn it into steaming/poaching & the barbeque flavour will be lost. When the prawns are cooked, turn heat to high and add the fish sauce. You can feel the aroma wafting. Stir to get good distribution. Dish out of the wok & serve.

Spanish Slow-cooked Beef Ribs

ImageI had this really nice lunch at La Cicala with my son Wen Yu when he was back from UK for vacation in summer 2012. They have a S$25++pax lunch set that offers choice of 2 tapas+1main course+1 dessert – really great value.  I had the Basque seafood stew as 1 tapas & the Spanish beef rib as the main, and enjoyed the lunch & companion of my son thoroughly. 🙂

I then googled and found this Spanish beef ribs recipe among others. I use Spanish chorizo that gives it a very nice flavour that for me enhances the beefy taste but also added Chinese sausage which for me added to the sweetness (some may not like this addition). The carrots, celery & yellow onions provide a very sweet vegetable broth as a counterpoint for the beefy dish, & the red peppers & tumeric (saffron is too expensive & troublesome to get for me) add to the vibrancy of the colours.

ImageI bought chuck ribs from Giant usually during sales at S$1.49 per 100g (on one occasion just S$0.99 per 100g). A 1.2kg packet with 6 ribs costs around S$20 and serves 6 – in my case as I do many course and tapas items, it can serve 8).

Spanish slow-braised beef ribs (dish was inspired by La Cicala)

Spanish slow-braised beef ribs (dish was inspired by La Cicala)

My son, though he likes my beef ribs, still prefers the La Cicala version which has beef broth instead of vegetable broth as the sauce base. I am happy with this vegetable broth version to balance the strong beefiness.

Spanish slow-braised beef ribs (dish was inspired by La Cicala)

Spanish slow-braised beef ribs (dish was inspired by La Cicala)

Spanish slow-braised beef ribs (dish was inspired by La Cicala)

Spanish slow-braised beef ribs (dish was inspired by La Cicala)

ImageI had this for the 6.10.2012 dinner which by design coincided with Jeanette’s birthday celebration & the photo above was taken by Jeanette who loved the dish. I did this again for the “Best Of” dinner and all my friends (even Cheng Poon who generally avoided beef) loved it!

c.h.e.f andy

Ingredients:

  • 1.2kg chuck ribs
  • 1 onion, diced
  • 1 carrot, peeled & diced
  • 1 celery, diced
  • 2 cloves garlic, minced
  • 1 Spaish chorizo + 1 Chinese sausage, cut into 1 cm pieces
  • 1 red pepper, cut into 2cm pieces
  • 3 tbsp olive oil
  • 1 tbsp flour
  • 1 cup white wine
  • 3 cups chicken stock
  • sea salt & coarse black pepper to taste

Directions:

  1. Season chuck ribs with sea salt & coarse black pepper.
  2. Place in a baking tray & put in the oven preheated to 210degC (I use the grill function) 12 minutes on each side to brown.
  3. fry onion, carrot & celery in olive oil over high heat in a large wok until the vegetables softened.
  4. Add minced garlic & Spanish chorizo & Chinese sausage and cooked until they are nicely browned, around 5 minutes. Add the red peppers & flour and cooked for a few minutes.
  5. Add the white wine & reduced the liquid by 1/2. Add the chuck ribs. Turn to low heat and braised the ribs for 2hrs until the ribs are tender & falling off the bones. Season with sea salt to taste, portion the ribs & serve.

Chocolate Lava Cake

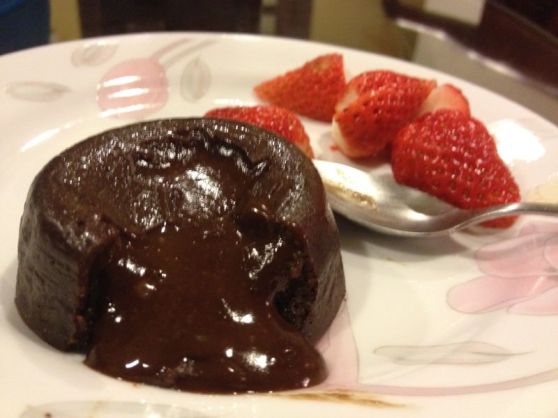
Chocolate Lava Cake with Strawberries

as it turned out, i subsequently made very good tofu cheese cake, tiramisu, banoffee cake & pumpkin cheese cake, so i have not made the lava cake for a while. i also tried a jam crumb cake which was pretty ok too.

I am generally NOT a dessert person. When dining out with family or friends, I will take the lower cost 2-course option (for set meals) & pick an appetizer & main, ostensibly also to avoid too much calories.

I also have NOT baked in my entire life before this, and in any case I only started any form of serious exploring of cooking from Mar2012 when I had my first 5-course home cooked dinner for friends.

It was in August 2012 after a very nice smoked meat dinner at a friend’s place, where some friends brought along a very nice tiramisu cake, that I started then to google for some dessert I can make. Well I found one which I now do rather well – the oozing chocolate lava cake. But I must say that I am both NOT motivated and luckless in finding another “worthwhile” dessert to make (worthwhile being that there is a “wow” factor in producing it & it is nearly as good or better than what you can grab from a good bakery stall). I can make a passable apple pie now but does not quite meet my “worthwhile” criteria. I had been looking at soufle recipes for a while and hopefully that would be the subject of my post in the not too distant future.

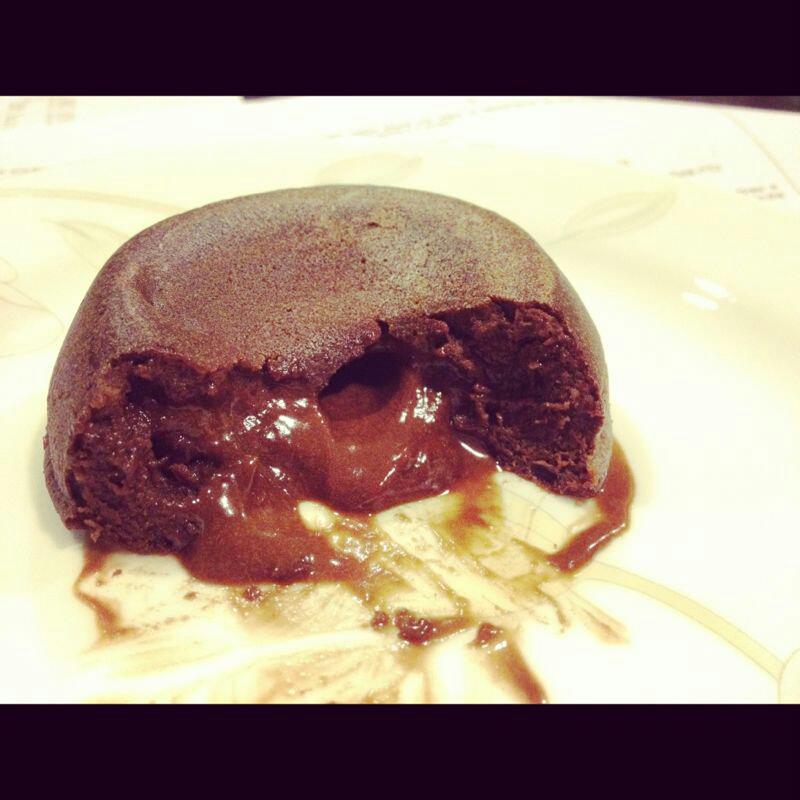
Back to the oozing chocolate lava cake. I was successful in my 3rd attempt, and thanks to Facebook for being such a faithful repository of memories, that was on 22.8.2012!

success at 3rd try!chocolate lava cake oozing lava @ home 0n 22.8.2012

success at 3rd try!
chocolate lava cake oozing lava @ home 0n 22.8.2012

Well, now I can make an awesome chocolate lava cake 99% of the time successful. It is NOT really as good as some very good ones in restaurants here but still equal or better than many.

The keys to a good chocolate lava cake are (1) taste & (2) lava; otherwise it will be just a good tasting brownie! I find the 70% cocoa chocolate makes the lava cake flavour really mesmerising. I have tried Cadbury Old Gold Dark Chocolate but w/o the cocoa the taste experience is several notch down, so if you do you will need to experiment with adding cocoa to get to the right taste. For the lava, the size of the muffin tray (I still do not have ramekins!),  temperature & timing are CRITICAL; and because in this recipe the time is only 3mins 30secs, any variation & you will have to trial & error to get the correct combination. For example, I have to use the grill function at 210degC in order that the top hardens while inside is still molten & let the bottom harden further while resting for few minutes!

c.h.e.f andy

Ingredients:

  • Cadbury Old Gold chocolate 70% cocoa 100g (1/2 bar)
  • unsalted butter 100g (0.4x250g bar)
  • sugar 1 tbsp flat
  • normal flour a tbsp flat & sifted
  • 3 eggs + 2 eggyolk
Directions:
  1. beat egg & sugar
  2. add in flour & beat (steps 1 & 2 can do together)
  3. melt butter & chocolate (on top) in microwave 70-80seconds & beat
  4. then add slowly to egg mixture (so egg won’t be cooked as chocolate slightly warm) & beat
  5. use butter cube to grease thoroughly each cup of 6 cup small muffin tray & fill up 70% with the chocolate mix
  6. preheat oven to 210degC and put to grill/broil function
  7. place muffin tray in preheated oven – use phone to time 3mins 15secs & remove immediately
  8. leave muffin tray for few minutes for bottom (top when inverted) to harden
  9. invert & serve the chocolate lava cake with a nice ice-cream or strawberries

Skin-on Pan-roasted Brined Chicken Breast

skin-on pan-roasted brined chicken breast

skin-on pan-roasted brined chicken breast

I first heard about brining from a friend wei (must give credit where credit is due..haha!) some 7 months back when she invited a few of us for a homecooked lunch of (you guessed it!) roasted brined spatchcock, GR (Gordon Ramsay) crackling belly pork, roasted pumpkin/tomatoes/onions & focaccia etc.

At the time I was doing a rather nice but boring oven roast chicken the usual way of rubbing with a marinate of seasalt, pepper, herbs (rosemary, basil, parsley flakes etc) and pushing whole cloves of garlic under the skin & putting it to the oven. So I was reading about brining for interest but has yet to find much use for it.

see here for a good read about brining.

Then I came across a super video recipe for this skin-on pan-roasted brined chicken breast & tried it on New Year Eve 31.12.2012 & it worked beautifully. I have since done it a few times & it unfailingly produces the best moist, tender, tasty chicken breast. I cooked it for the CNY (Chinese New Year) 3rd Day gathering of 14 hungry 19-year olds for Su Lin, my youngest daughter & the youngsters all loved the chicken; and I might add also the belly pork, pasta & angus beef steak!

I have gone on and tried the recipe on chicken drumstick (I have to agree with Su Lin that I actually like the drumstick even better) and also varied the recipe on duck breast & drumstick – here both are very good but the brined duck breast is just, just SENSATIONAL!

pan-roasted brined chicken drumstick

pan-roasted brined chicken drumstick

and here is the video recipe.

c.h.e.f andy

Ingredients:

  • 2xchicken breasts with wingstick (I use a 1.4kg chicken from Sheng Shiong or Giant hypermarket)
  • 1 litre water
  • 5% salt (about 50g)
  • 3% sugar (about 30g)
  • 5 limes (or about 30ml bottled lime juice)

Directions:

  1. Preparing the chicken breasts with wingstick – use kitchen scissors to cut chicken in 1/2, then cut around the drumstick into 1/4 (breast with wingstick & drumstick quarters),  then cut away & remove the bones under the breast completely, then cut away the fat, wash & clean
  2. Brining – add 1 litre water in a large plastic container, mix in about 3 heap tablespoon salt & 2 heap tablespoon sugar & stir to dissolve, then pour in 30ml bottled lime juice or squeeze juice from about 5 limes. Put 2x cleaned chicken breasts with wingstick into the container and place container in fridge for 24hours. Remove & wash chicken breasts thoroughly in slow running water & place on a rack to airdry in fridge for 24hrs (can also skip this step & dry with kitchen towels)
  3. Cooking – Remove chicken breasts from fridge & leave it at room temperature for at least 1/2hr. Heat oven-proof non-stick pan on high heat, add olive oil to grease pan & turn to medium heat. Place the chicken breasts 1 at a time skin-down in hot pan & fry for 4minutes to get crispy skin. The oil will sputter a bit, turn to low heat after 1 minute. Preheat oven to 250degC. Place oven-proof pan in oven & let the chicken cook for 10minutes. Remove pan from oven & remove chicken breasts from pan immediately & let them rest for 10 minutes, Serve.

I am NO chef!

SORRY GUYS!

chefandy is NOT a chef’s blog! I am NO chef!

The only reference to “chef” you will find in this blog will be to the great chefs who I pick & learn my internet & video recipes from.

c.h.e.f stands for cook.hangout.eat.fun

I cook, somewhat belatedly in life I must add but in time to discover that I am really liking it (hohoho! so I am now an ardous advocate of better late than never!), and maybe because I have nothing better to do (haha! just being self-deprecating – learning to laugh at myself – a good habit that does no harm to ego or prestige).

The journey probably started on 12.3.2012, when I invited 10 friends for homecooked dinner. Looking back at the photos of the 5 dishes I did then, I am truly a lucky bloke to have all these indulgent & risk taker friends – if it were me, I probably won’t care much to be invited again. haha! anyway, that will be story & photos enough for another post.

see also why i blog & my guidelines & perspectives.

c.h.e.f andy