Steamed Razor Clams with Garlic Oil

steamed razor clams with garlic - beautiful pic taken by Jeanette at 6.10.2012 homecooked dinner

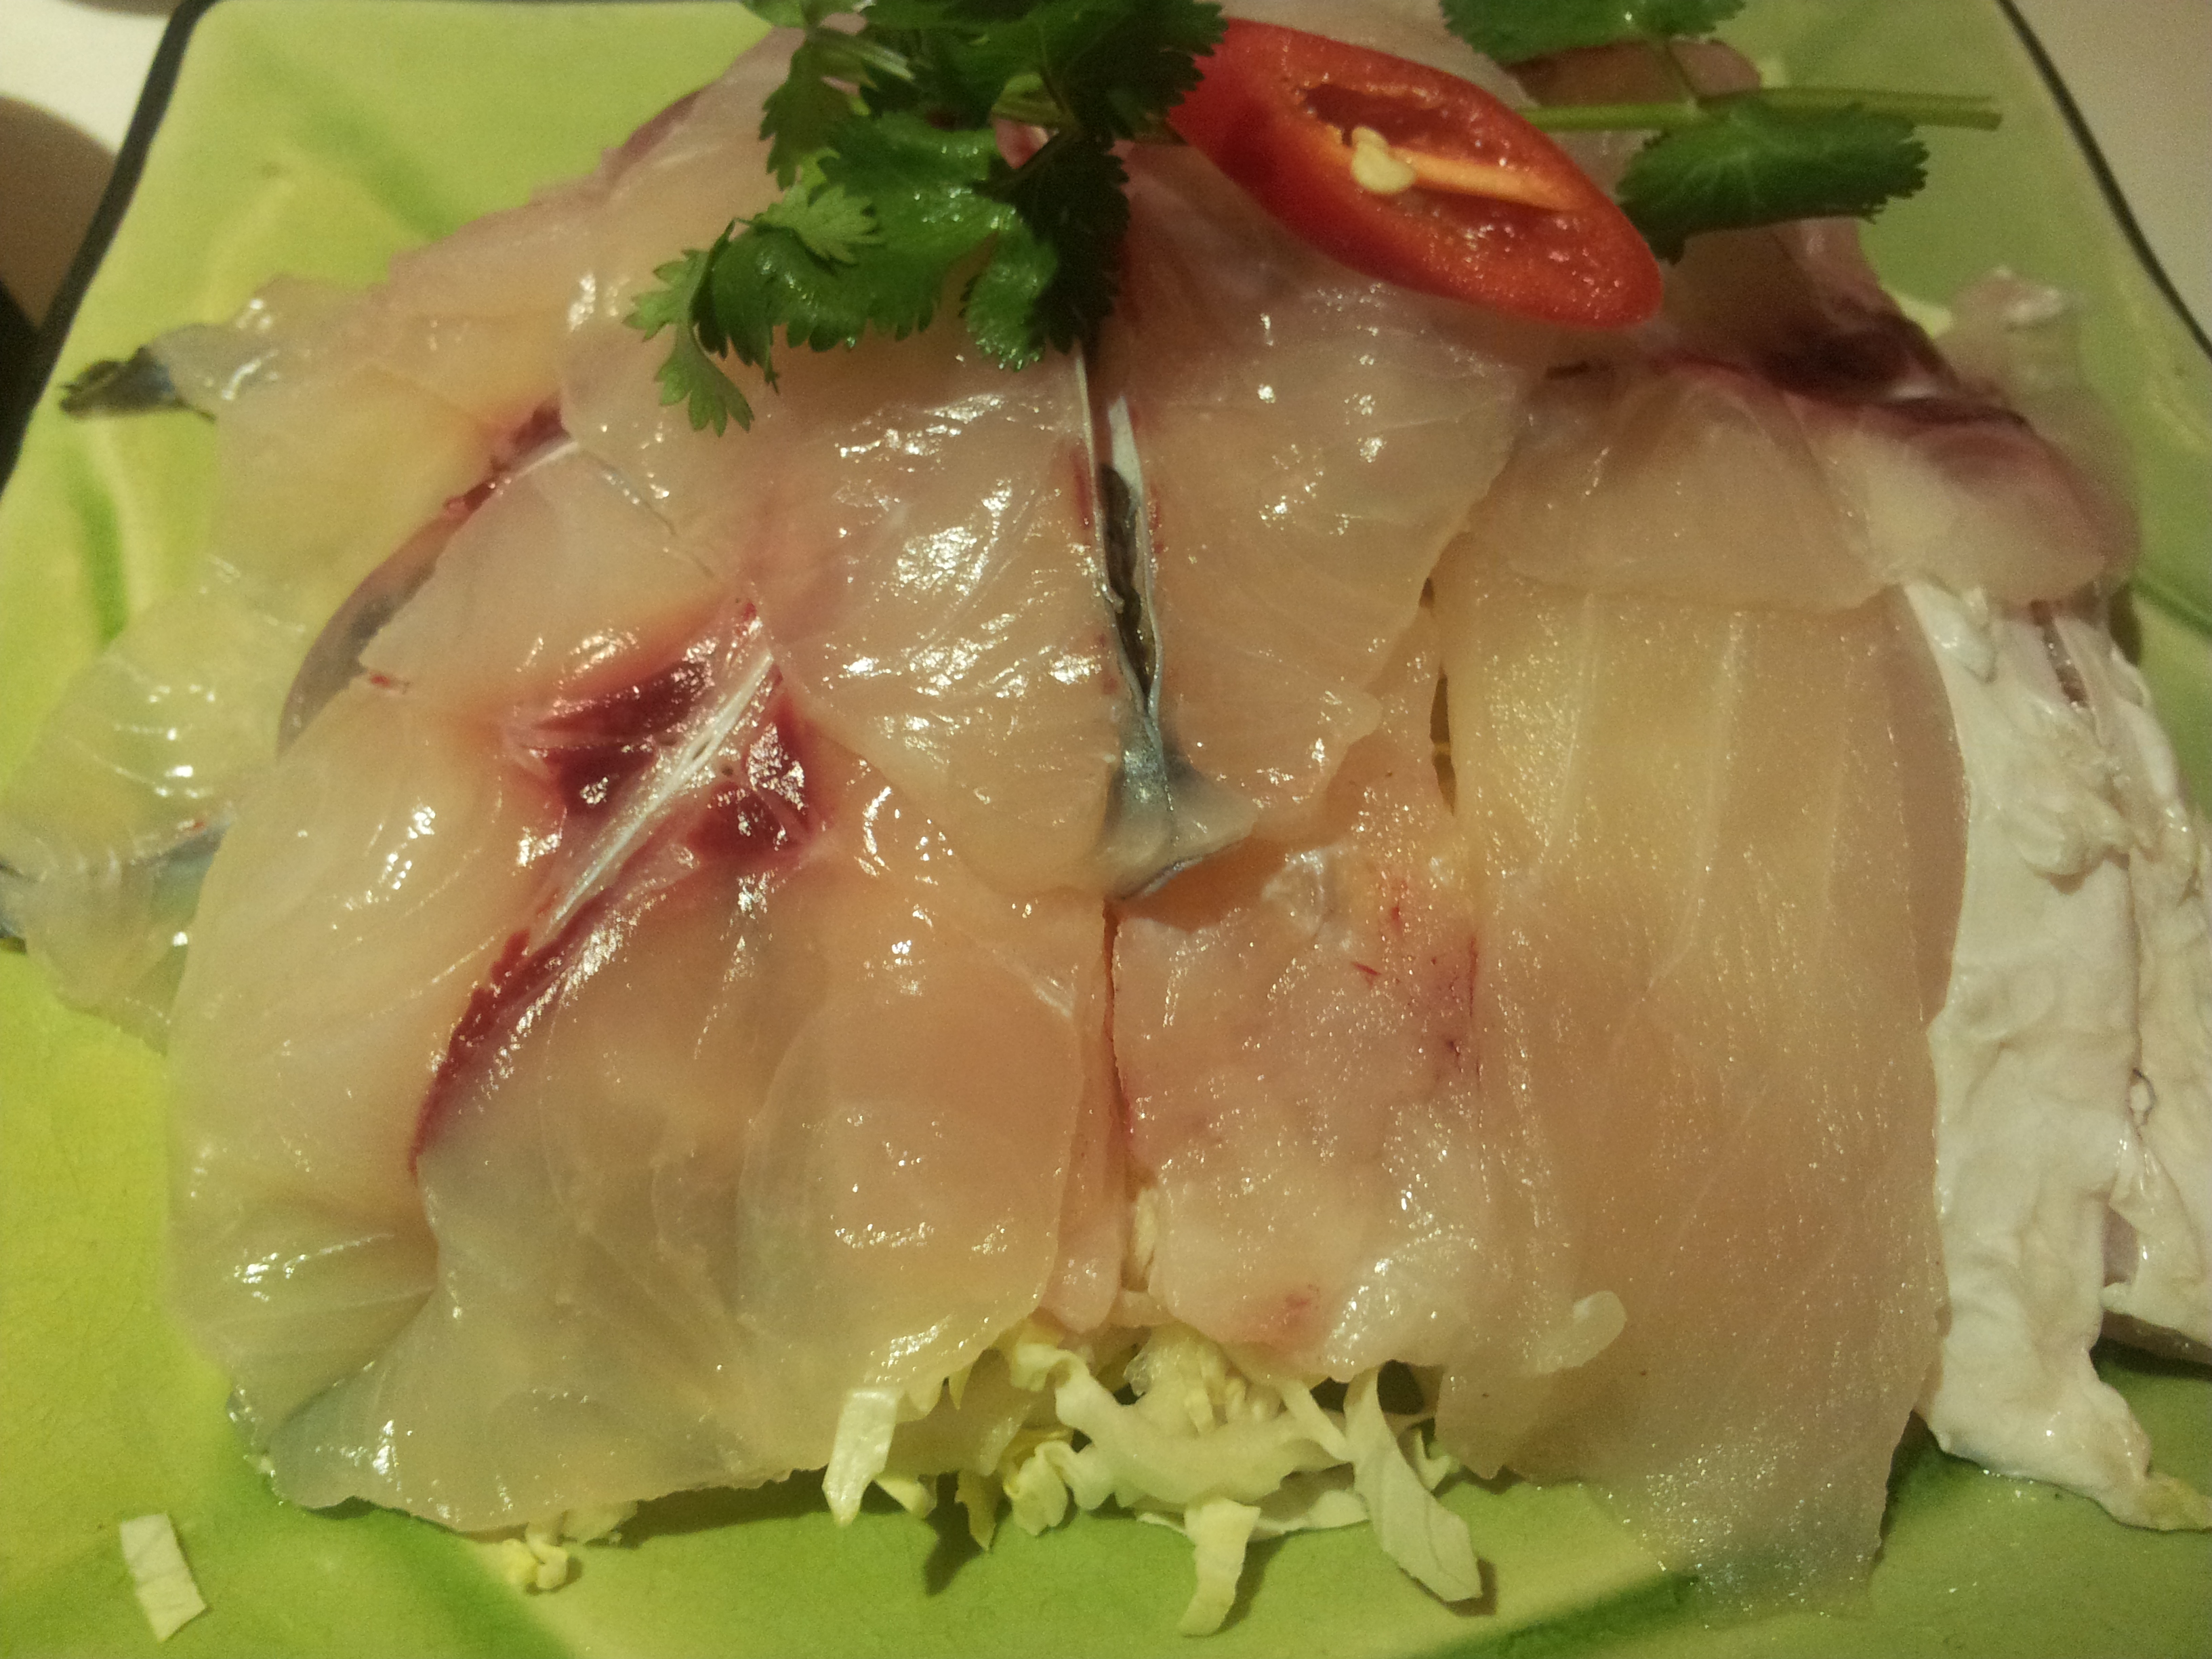
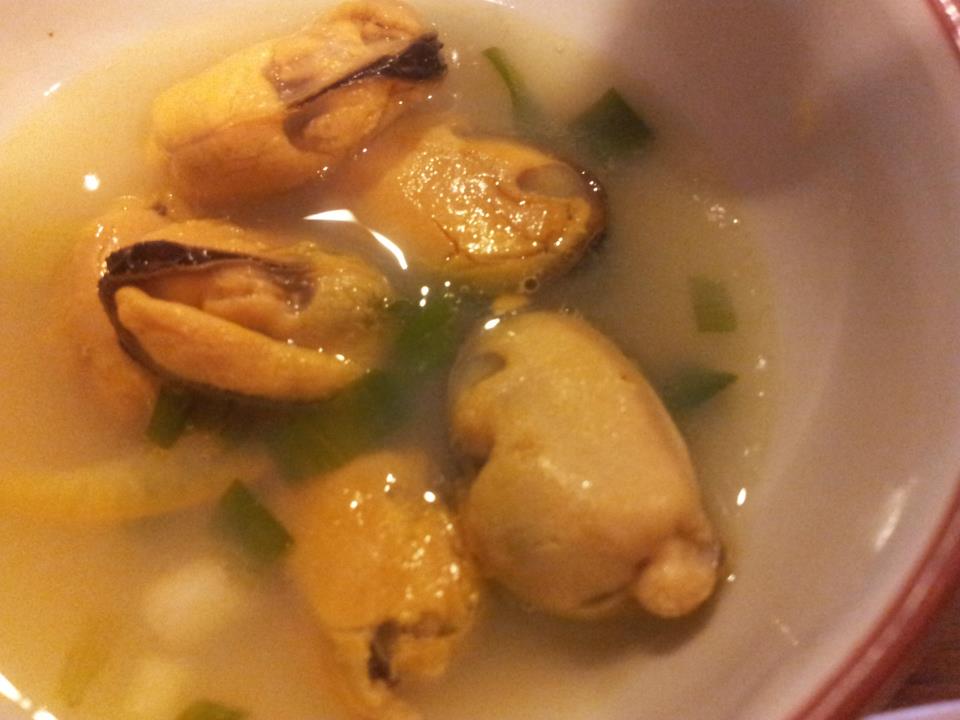
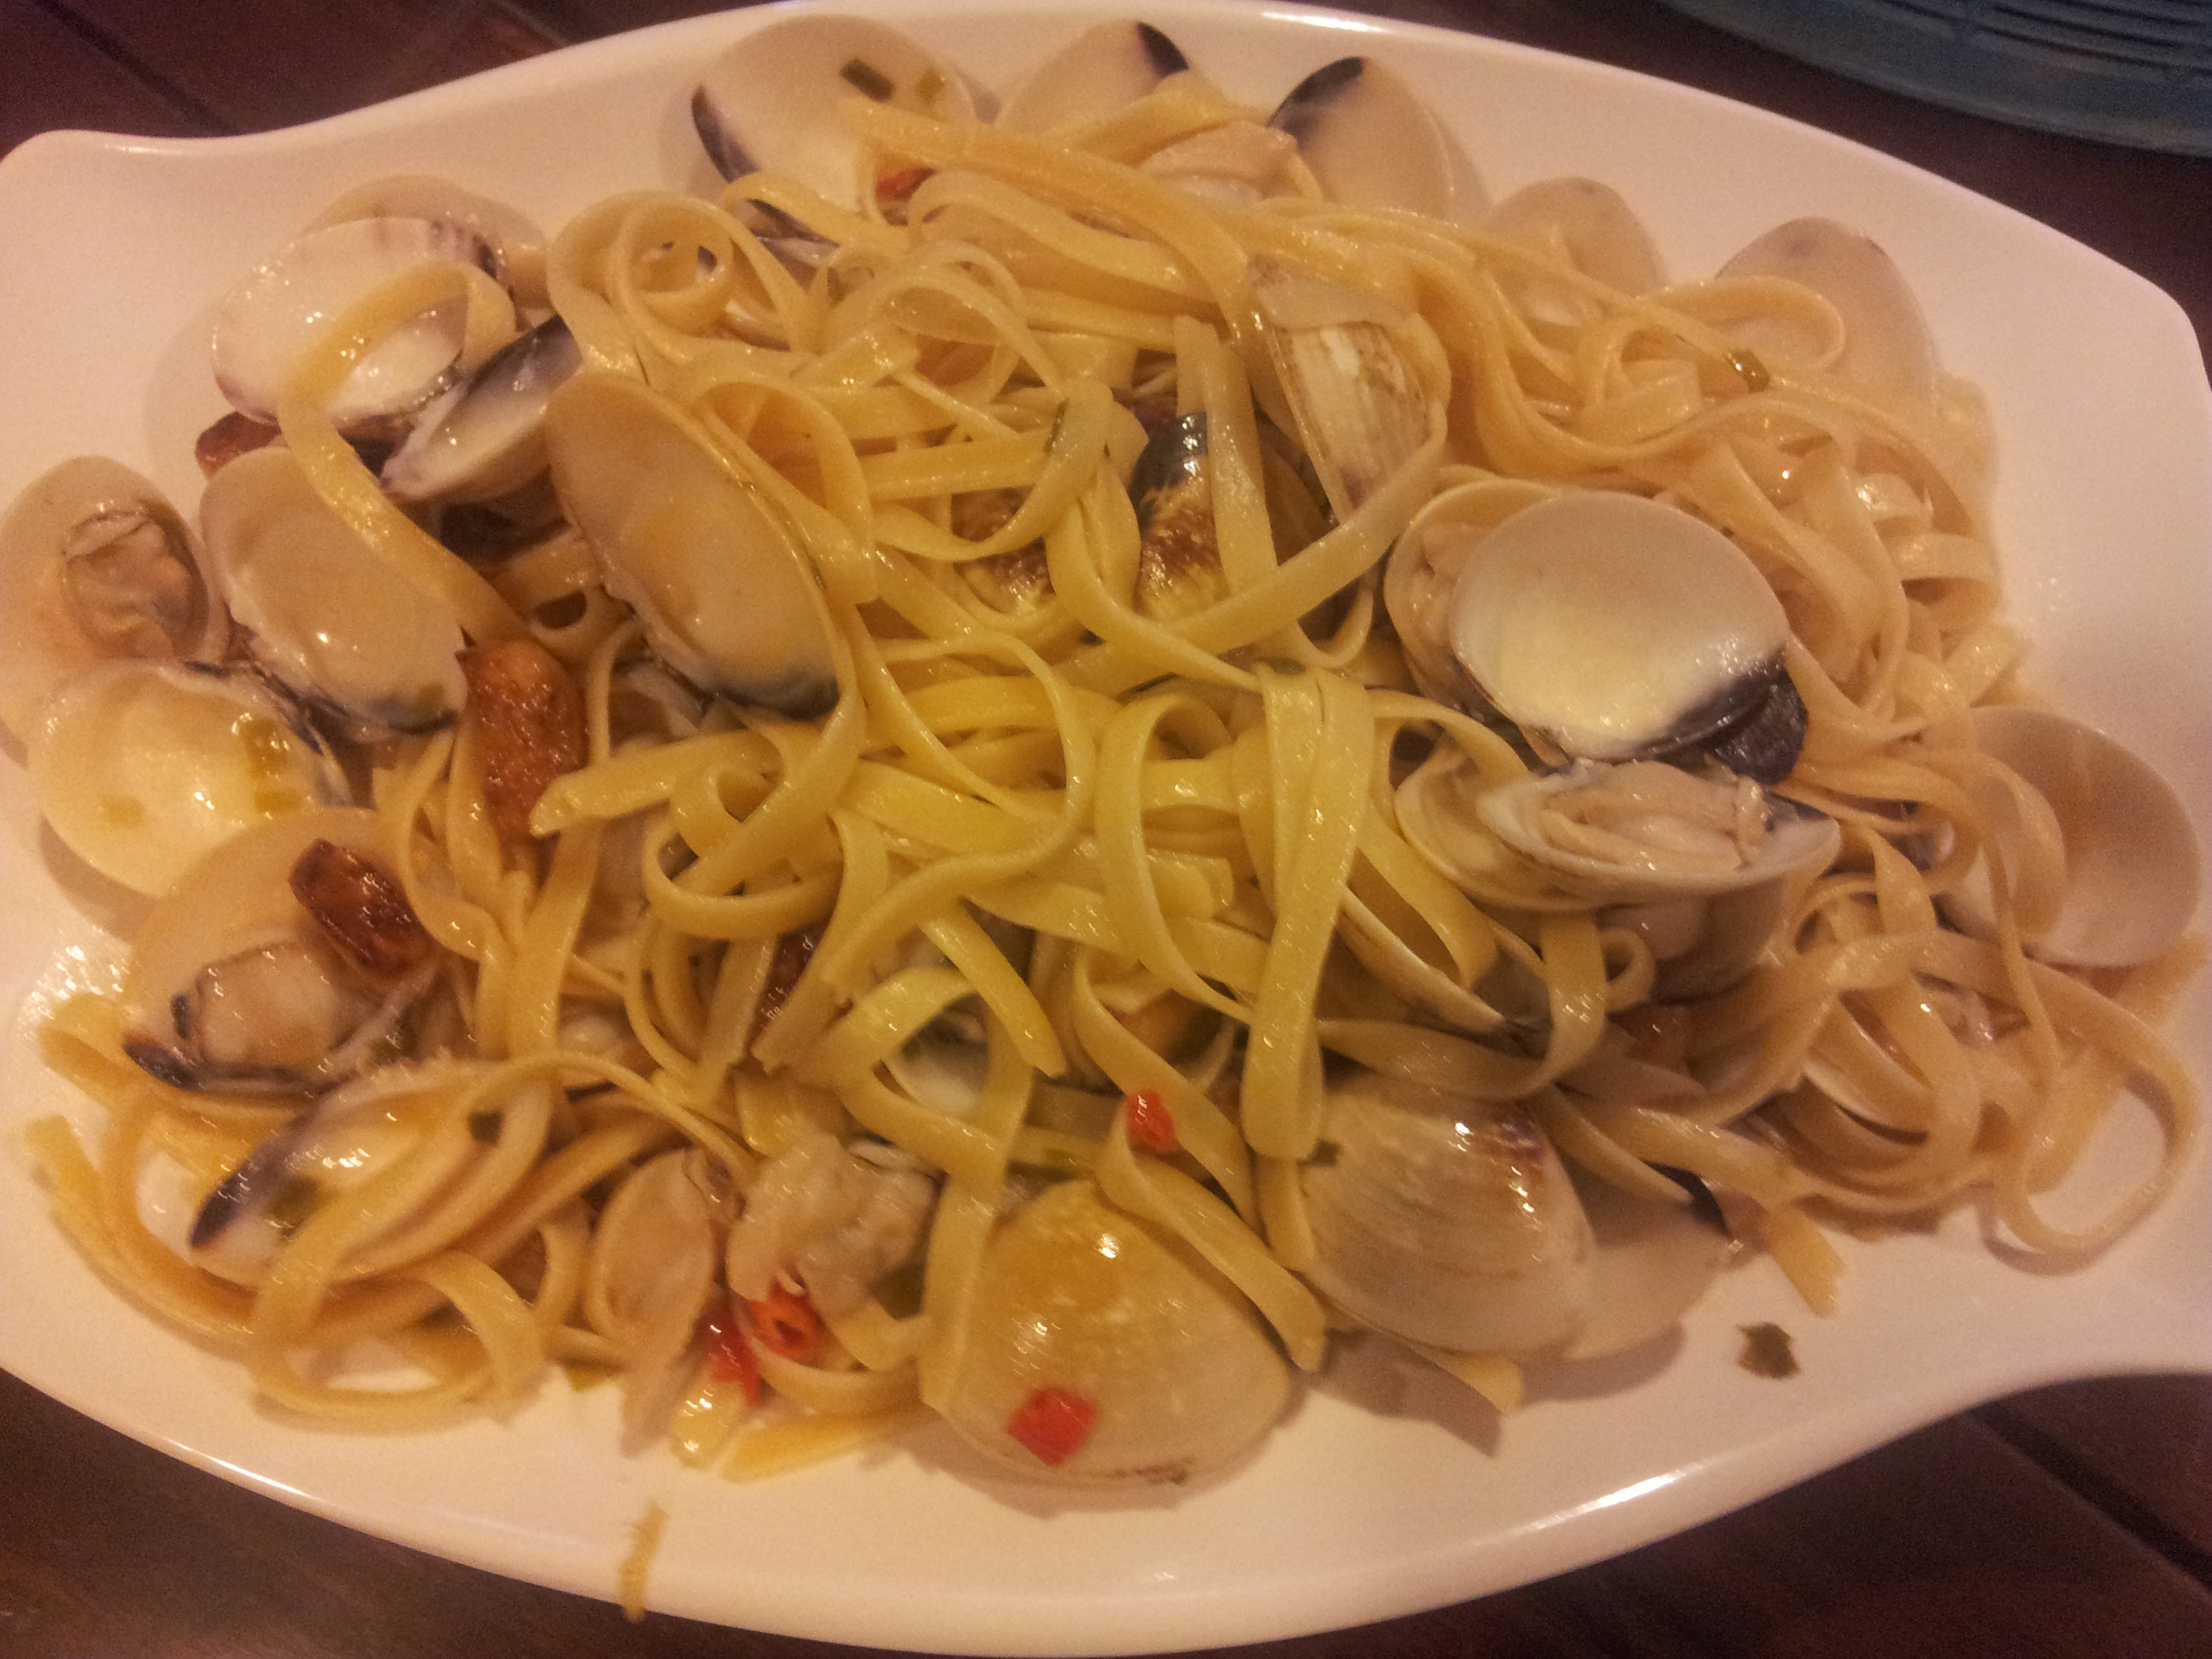
steamed razor clams with garlic oil – beautiful pic taken by Jeanette at 6.10.2012 homecooked dinner

See also Chef=cookhangouteatfun.

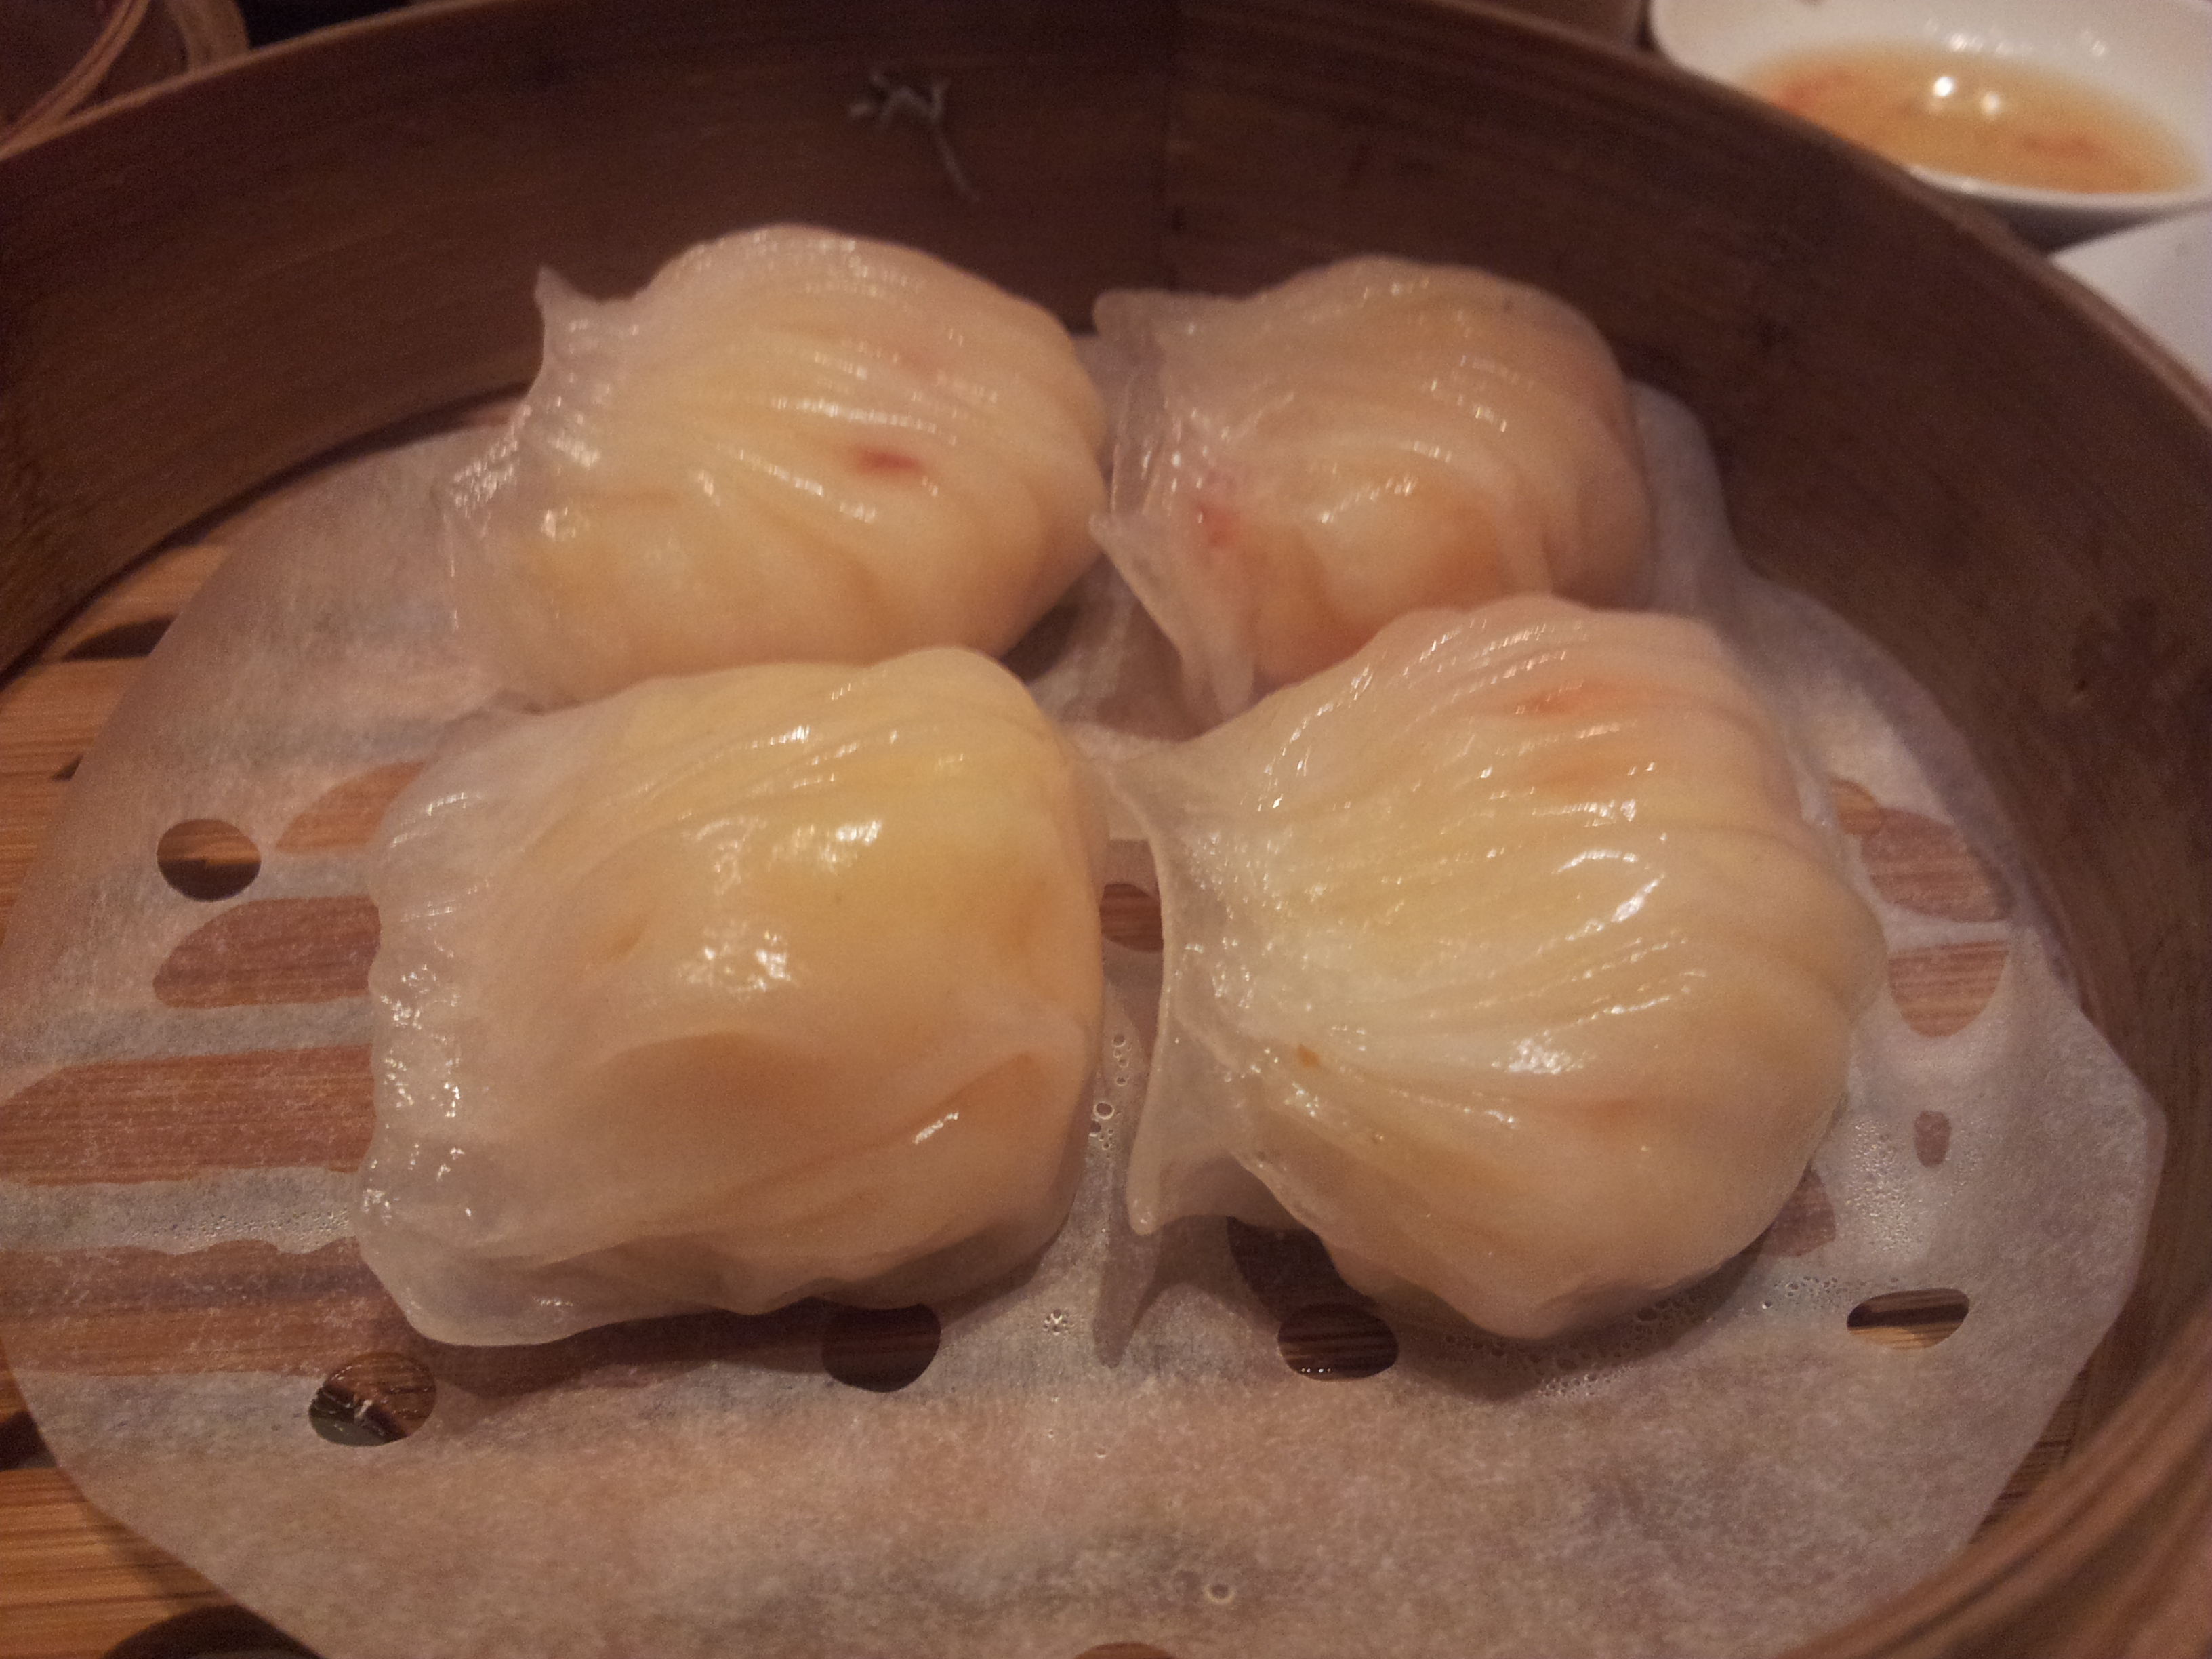
Steamed razor clams is a common dish served in many seafood restaurants. I had many times very good ones at Ah Yat Turf City and couple times at Long Beach Dempsey. These days, cooking methods & processes are quite precise and I seldom come across a live fish that is not steamed just right (in older times we get undercooked & overcooked fish). The same with razor clams.

No recipe is needed to cook this dish really. It is just a matter of getting the razor clams, cleaning them (which is a big hassle) and then steaming PLUS doing the lightly browned garlic oil to drench over them.

I get my IQF (Individual Quick Freeze) razor clams from Giant hypermarket & Shop n Save (these days you get IQF everything – mussels, scallops, fish fillets etc). Normal price is S$11.95 for one 500g packet containing 8 to 11 large razor clams. Sometimes I get them during sales and it can be S$8.95, so just about $1 per clam. At the restaurants, you get live ones & will on average pay S$8++ (about $9.40) per clam.

Cleaning as I said is a hassle. I use kitchen scissors to cut away the blackish sag of innards & clean each clam thoroughly in slow running water (there will be a lot of soil & you will feel like you are eating sand if you don’t clean them). For the garlic oil, I just fry minced garlic on low heat with oil to brown them & then set aside the lightly browned garlic with oil in a bowl.

To steam the clams, you can use the usual steamer for about 6 minutes (just make sure you are able to remove the plate holding the clams out of the steamer when it is very hot). I find it easier to just poach the clams (w/o the shell) with the garlic oil & add 1 tablespoon light soy sauce in a covered saucepan for a few (about 4) minutes. Then I remove the steamed clams, place each on an individual cleaned 1/2 shell on a serving dish, and then spoon the garlic oil over the clams.

The result is the beautiful dish above.  I would say it is 95% as good as the restaurants that do them well, and better than those that can’t do them properly.

c.h.e.f andy

Ingredients:

  • 1x500g packet IQF (Instant Quick Freeze) razor clams – OR if you can get fresh ones that are not too costly
  • 3 tbsp minced garlic
  • 5 tbsp oil
  • 1 tbsp light soy sauce

Directions:

  • Prepare the clams – defrost, cut/remove from shell, cut away the blackish sags of innards & clean thoroughly, airdry in fridge. clean enough 1/2 shells to place the clams on.
  • Cook the clams – lightly brown the minced garlic so you have the garlic oil ready in a large saucepan. add the clams & drizzle 1 tablespoon light soy sauce over it. Turn the fire to high to heat up & then quick lower to medium & cover for 4 minutes until the clams turned a white opaque colour (as in above picture). Turn off the fire, remove the clams & place each on cleaned individual 1/2shells on a large serving dish. spoon the garlic oil over each clam & serve.

Great Family Lunch @ Imperial Treasure Teochew Restaurant Ngee Ann City on 17Mar2013

har gau (蝦饺)

har gau (蝦饺)

See also my review on imperial treasure teochew on 1.9.2013. 🙂

had a really nice family dimsum lunch today @ Imperial Treasure Teochew Restaurant at Ngee Ann City today.

They are really packed. We managed to book 11.30am and supposed to clear out before 12.30pm. The food came really fast, and though we did not feel rushed at all still we did not have any problem leaving before 12.30pm after a very satisfying lunch indeed. 🙂

We ordered Su Min’s favourite har gau & fun cheung with prawns (or har cheung), pork neck char siew, braised duck, steam pork ribs, a teochew dumpling, and 2 deepfried dumplings. The entire lunch came to $79 for 4pax – a really great lunch, good food, good friendly if speedy service, and very enjoyable meal. 🙂

The har gau was very good, skin not soft or soggy, prawns fresh & firm. The steamed pork ribs were very tasty & have good pieces of meat, not too fatty.

steamed pork ribs

steamed pork ribs

The har cheung was one of the better ones, though still could not compare with the very good smooth ones we had in Hong Kong.

har cheung (虾肠粉)

har cheung (虾肠粉)

The hum sio gok was also very good, fillings were tasty & the dough nice & little sticky too (as it should be).

hum sio gok (咸水饺)

hum sio gok (咸水饺)

And the teochew dumplings were actually better than I expected. I had some not so great ones previously.

teochew dumplings (潮州粉果)

teochew dumplings (潮州粉果)

The pork neck char siu was slightly sweet but overall very good, portion was small but it was only S$8. I have tried cooking this before & I know pork neck is really the best part for char siu, much better than the loin or belly. 🙂

pork neck char siew (炭燒猪项肉) - S$8

pork neck char siu (炭燒猪项肉) – S$8

I could not remember the name of this crispy dumpling,  it was something I used to like much before but did not take often lately. It was still good.

crispy buns

crispy dumplings

The braised duck here & in Crystal Jade were always good. The portion (partially eaten already in the poorly focused photo below) was good for the price – just S$14.

teochew braised duck - S$14

teochew braised duck – S$14

We ended with the salted egg buns which we all liked. This was very good here. The salted egg taste was strong but not overpowering & it was not too sweet. One of the best I had – I liked this a lot.

salted egg buns (咸蛋流沙包)

salted egg buns (咸蛋流沙包)

salted egg buns (咸蛋流沙包)

salted egg buns (咸蛋流沙包)

I think Crystal Jade & Imperial Treasure have really improve Singapore’s dimsum & restaurant food quality at affordable price over the last 10 years, and now we have really good eats at prices that do not burn a hole in the pocket. 🙂

Imperial Treasure Teochew Restaurant @ Ngee Ann City

Imperial Treasure Teochew Restaurant @ Ngee Ann City

c.h.e.f andy

Oven Slow-roast Pork Belly

Image

oven slow-roast pork belly

I have NOT been too successful when it comes to cooking belly pork. First, it is really not so healthy to be eating belly pork often & my family members are not really crazy over it. The more successful pork belly dish I have made is kakuni – Japanese slow-braised pork belly.

Anyhow I wanted a wider selection of dishes for my homecooked makan (meal) gatherings, so I still somewhat doggedly try out different cooking methods for pork belly. I find GR (Gordon Ramsay)’s crackling skin pressed pork belly too difficult to make, so I try out various slow-roast to get a dish that is good enough for my purpose.

The best version I have created is in the top picture. I did that when my youngest 19-year old daughter invited 14 friends to the house for lunch on the 3rd day of the recent Chinese New Year, 2013.

I use a square-cut block of belly pork, place it in boiling water for like 10seconds, then place it in cold water, wipe it clean & dry with kitchen towel or airdry in fridge. I then rub the belly pork with white sugar (but not the skin), place it in a baking dish skin-side up, drizzle Chinese old shaoxing wine (陈年绍兴酒) & then olive oil over it. I cover the baking dish with aluminium foil & place it in a preheated 175degC oven for 1/2 hr. I remove the dish from the oven, turn over the belly pork so it is skin-side down & drizzle 1 tablespoon light soy sauce, & letting the oven cool. I then preset the oven to 90degC on the low heat function and leave it for 3/4hr, turnover once again for another 3/4hr. So the total time is 2hrs.

The end result is the picture above, though the belly pork is looking pretty with a nice pink, it is fully cooked. That is my best production with this method so far.

Image

oven slow-roast pork belly

I tried it again for my recent gathering of friends, with a slight variation. Instead of the low heat function, I use the normal function still set to 90degC. The result is the one below. The texture of the fat & meat is still as good & soft, the skin is just very little bit tougher. One addition I made is the Spanish spicy mustard sauce. This is a really nice concoction & together with the original sauce from the belly pork (after passing through a sieve) made 2 very nice dipping sauce for the belly pork. 🙂

c.h.e.f andy

Ingredients:

  • 1 block square cut belly pork (about 350g)
  • 2 tbsp sugar
  • 1 tbsp Chinese old shaoxing wine (陈年绍兴酒)
  • 1 tbsp olive oil
  • 1 tbsp light soy sauce

For spicy Spanish mustard sauce:

  • 1 tsp dijon mustard
  • 1 tsp red wine vinegar
  • 1 cut chilli padi
  • 2 tsp olive oil

Directions:

  1. Prepare the belly pork – place it in boiling water for like 10seconds, then place it in cold water, wipe it clean & dry with kitchen towel or airdry in fridge.  rub the belly pork with white sugar (but not the skin), place it in a baking dish skin-side up, drizzle Chinese old shaoxing wine (陈年绍兴酒) & then olive oil over it.
  2. Cook the belly pork – cover the baking dish with aluminium foil & place it in a preheated 175degC oven for 1/2 hr. remove the dish from the oven, turn over the belly pork so it is skin-side down & drizzle 1 tablespoon light soy sauce, & letting the oven cool.  preset the oven to 90degC on the low heat function and leave it for 3/4hr, turnover once again for another 3/4hr. total time is 2hrs. remove from oven, rest & serve.
  3. Make spicy Spanish mustard sauce – put a teaspoon of dijon mustard in a small bowl, add 1 cut chilli padi, 1 teaspoon red wine vinegar, and 2 teaspoon olive oil. mix well.

Oven Roast Chicken

oven roast chicken

oven roast chicken

Before I discovered the brining technique (& now use often) for pan-roasted brined chicken breast, I was doing a rather good oven roast chicken. 🙂

It is really easy to do & require very little preparation effort.

First, I cut away the head & feet, wash clean thoroughly  & fold in the wings.  I usually leave the chicken on a rack to airdry in the fridge but you can dry it with kitchen towels.

Then I prepare a rub comprising seasalt, coarse black pepper and a dry herb mix (rosemary, basil, parsley flake etc). Of course you can use fresh herbs if you have them. Next I rub all over the chicken & the inside cavity. I then lift the skin (carefully w/o tearing)  & rub below the skin. I also inserted peeled garlic cloves under the skin. You can skip this if you like a nice skin as the garlic will made dark patches on the skin after roast as in above picture. Finally I rub oyster sauce on the chicken & then drizzle/rub olive oil over the skin (olive oil helps the skin not to get burnt). 🙂

I place the chicken breast-side up on a aluminium foil-lined baking tray in a preheated 175degC oven using the grill function for 25minustes. I then turn over the chicken and grill for another 20minutes.

I have been able to consistently reproduce very moist, tender & sweet roast chicken. 🙂

c.h.e.f andy

Ingredients:

  • 1.1kg chicken from Giant hypermarket (if you sue a 1.4kg chicken or other size you will have to try out the ove timing or I guess use a meat thermometer which I have not yet learned to use!)
  • 2 tbsp oyster sauce
  • 1 tbsp olive oil
  • 1 bulb of peeled garlic cloves

make a rub comprising:

  • 1.5 tbsp seasalt
  • 1 tbsp coarse black pepper
  • 2 tsp rosemary flakes
  • 2 tsp basil flakes
  • 2 tsp parsley flakes

Directions:

  1. Prepare the chicken – cut away the head & feet, wash clean thoroughly  & fold in the wings.   leave the chicken on a rack to airdry in the fridge  (or you can dry it with kitchen towels). Apply the rub all over the chicken skin & inside. lift the skin (careful not to tear) and rub under the skin. Insert the peeled garlic cloves under the skin (or you can skip this if you don’t want to have dark patches on the skin).
  2. Cook the chicken – place the chicken breast-side up on a aluminium foil-lined baking tray in a preheated 175degC oven using the grill function for 25minustes. turn over the chicken and grill for another 20minutes. remove from oven & let the chicken rests, and then debone or carve & serve.

Beef Hotpot @ Budaoweng(不倒翁) at iSquare, Tsimshatsui Hong Kong on 9Mar2013

handcut US angus marbled beef (肥牛)

handcut US angus marbled beef (肥牛)

The beef hotpot at Budaoweng(不倒翁) is favourite with my wife Lisa (& with me too!). Everytime she is in Hong Kong. she will go for a late supper (宵夜-there is a 40% discount after 9.30pm during weekdays & after 9.45pm during weekends), sometimes twice during her stay. This time is no exception.

During our recent trip to Hong Kong, we arrived & checked-in to Marco Polo Prince Hotel about 8.15pm, so timing was quite perfect. 不倒翁 was just a short walk to iSquare and there was no need to pre-book. We did this again on the evening of 11.3.2013, before flying back Singapore the next day.

We ordered the usual large portion of specially selected handcut US angus marbled beef (特选手切肥牛)- HK$168 after 40% discount. You can see the marbling, and this is really flavourful & tender, melting in the mouth. I thoroughly enjoyed this even though we ate exactly the same thing the second visit. Both times we were greedy and ordered another small portion of beef  – HK$138 after 40% discount. Our daughter Su Lin was with us, so there were 3 of us. I could just eat the beef & vegetables and nothing else.

Image

very nice prawn dumplings, each with 3 very fresh big prawns

We also ordered a plate of prawn dumplings – 8 for HK$58. You could also order a 1/2plate – 4 dumplings for HK$30. This was really good too. Each dumpling had 3 very fresh large prawns, the skin was smooth, and it’s super tasty.

Image

脆鲩鱼骨腩 (grass carp bones & belly)

I also added a 脆鲩鱼骨腩 (grass carp bones & belly) – HK$38. I like fish so I quite enjoyed it, but though 脆 means crunchy, it can mean tough & also several pieces have bones, so not everyone will like. We did not order that the second time we visited.

Image

prawn paste (虾滑)

Lisa also ordered a prawn paste (虾滑) – HK$58 – which is nice too, though we don’t really need to have that, and we did not order it the second time we visited.

Image

vegetable basket

We also had the vegetable basket. I cannot remember the price but it should be like HK$88 of HK$108. You must have vegetables for balance for a meat steamboat and Hong Kong vegetables are fresh & nice. On the second visit though we ordered just the Chinese lettuce for HK$48 & that was really quite sufficient.

hotpot soup base (汤底) - we had the HK$88 clear vegetable soup

hotpot soup base (汤底) – we had the HK$88 clear vegetable soup

There was a wide range of hotpot soup base, but since we went there primarily to take the beef, we opted for the cheapest HK$88 clear vegetable soup. There was also a HK$20pax charge for the condiments (调料) – haebeehiam, garlic, spring onions, chilli, chilli oil, wasabi, soy sauce etc (most hotpot restaurants in Hong Kong charged this also).

condiments platter - haebeehiam, chilli, chilli oil, wasabi, spring onions, sesame sauce, garlic etc

condiments platter – haebeehiam, chilli, chilli oil, wasabi, spring onions, sesame sauce, garlic etc

The entire meal, if you were to say order for 2pax 1 plate of beef, 1 plate dumpling & 1 Chinese lettuce + the plain soup base, it will set you back by HK$442 (inclusive of HK$20pax for the condiments & 10% service on top), and if you add a bottle of 350ml sake, that will be another HK$300+, so it is not really that cheap even after 40% discount. But to me the food quality & the enjoyment of it is well worth the price! Service is efficient, and they will bring hot water & ice, which are free (they don’t serve cold water only mineral water, I did not check the price but it should be ok to order it if you need to have mineral water..), we don’t really have any complaint about that.

c.h.e.f andy

Drunken Mussels with Orange Zest

drunken mussels with wine & orange zest

drunken mussels with wine & orange zest

This is another very easy dish to make.

I bought shelled mussels from Sheng Shiong previously but they were not as good, plump and big as the ones sold at QB Food.

For this dish, you just need to add 20g butter in a soup pot, throw in chopped spring onions (I used the white parts and reserve the green portion for garnishing) & orange zest from 1/2 an orange and stir-fry for <1minute, add 1 cup of wine and 1 cup of chicken stock and bring to boil, and then add 200g mussels & cook for 1-2 minutes, then garnish with chopped parsley (if you have) – I only use spring onions here.

drunken mussels with wine & orange zest

drunken mussels with wine & orange zest

It’s easy, delicious & all comfy goodness!

c.h.e.f andy

Pan-seared Hokkaido Scallops

pan-seared Hokkaido scallops

pan-seared Hokkaido scallops

Hokkaido scallops are plump, juicy & sweet.

I bought once from Isetan Orchard during a Japanese Fair and a 1kg box cost S$90 and they were really sweet.  I bought also from QB Food frozen USA scallops at S$17 for 500g but these were not so great. Recently I bought 1 box 900g from Sheng Shiong on promotion at S$24.80, and these were quite ok.

I previously had difficulty searing scallop because the technique was wrong. So again after I check out Foodwishes.com Chef John’s seared scallop recipe, I can now reproduce quite easily scallops with a nice sear (as in above picture).

As mentioned in the video, the trick is simply (1)a superhot pan & (2)bone dry scallops. Scallops, like fish, retain a lot of moisture and if they are not totally dry, the temperature of the pan will drop sharply and you will be boiling/poaching the scallop rather than searing it, and the burnt layer will come off & stick to the pan.

With the right technique then it is really simple. I dry the scallops on a rack in the fridge so that both top & bottom are dry & the water drip on to a bowl or tray below the rack. I bring out the scallops from the fridge for at least 1/2 hour to get it to room temperature. I lightly season the scallop with sea salt & coarse black pepper and place them in a superhot pan with olive oil & sear for 3minutes, watching the side cook to opaque white colour 1/3 to 1/2 way up & then flip the scallops. I cook for another 2-3minutes and then serve. It is that simple.

I have tried also Chef John’s orange supreme sauce, however I don’t really find much there as I don’t feel the sauce add anything to the scallop & maybe reduce the seared flavour & texture. I would rather have my seared scallops with rockets and cherry tomatoes dressed with olive oil, balsamic vinegar and sea salt.

c.h.e.f andy

Creamy Mushroom Soup

creamy mushroom soup

creamy mushroom soup

soup. auntie  Bes, my Filipino help who has been with us for 24 years, makes very good Chinese soup. They could be pork ribs with peanuts or lotus root soup, chicken bones & feet with old cucumbers or carrots or watercress or even green papaya, largely in the vein of Cantonese 例汤 – soup of the day. auntie Bes doesn’t do soup using pork (she only used pork ribs) though this is also common with Chinese soups and these days we don’t use much of Chinese ham (京华火腿) though in the early days when I travel to Beijing & Shanghai more, I did cart some of these back for soup. when I started doing homecooked dinners for friends, if I were doing dishes like braised duck, curry chicken and kakuni (Japaense braised belly pork), auntie Bes’ soup was a perfect fit. But then I also started doing western dinners, and soon afterwards after several visits to and enjoyable meals at La Cicala Spanish Gastrobar, I learned to cook a Basque seafood bisque, using prawn shells with white wine & brandy to create the bisque, with leek, yellow onions & carrots to add vegetable sweetness to the soup. It was quite successful & I used it for several of my homecooked dinners. But that was the only soup I knew how to cook, that is until yesterday. I had another 8-course lunch for 9pax yesterday so I thought I would test out another soup, and I kind of thought mushroom soup would be the most common, easiest to do and acceptable to most. So who do I turn to? you guess it right – Foodwishes.com Chef John’s creamy mushroom soup recipe. It went really well at first try, and all my friends enjoyed the soup very much.

caramelising 3 different mushrooms + leek + yellow onions

caramelising 3 different mushrooms + leek + yellow onions

I bought 250g of cut brown button mushrooms, 200g of oyster mushrooms & 150g of shimeji mushrooms from Sheng Shiong. I added a teasppon of salt & caramelised them in a soup pot according to the video instructions, then added the diced yellow onions & leek. I cooked them further & then fished out a few caramelised mushrooms as toppings for the soup later. I then added the flour and stirred them to thicken a little. Image Next I added the white wine, reduced and then added the chicken stock (made in a crockpot with chicken bones). I then put it on an induction cooker & put to the lowest at 100W & let it cooked for 1.5hrs. I let the soup cooled down, and then blended it in a blender in small batches. Then I brought it to boil in the pot, turned to low fire and added 2 tablespoon of heavy cream and mixed in the soup, and added sea salt & pepper to taste. To serve, I added a dash of extra virgin olive oil & placed couple caramelised mushrooms I reserved earlier as toppings. c.h.e.f andy Ingredients:

  • 600g mushrooms (button mushrooms or with other combinations) – served 8
  • 1/2 large yellow onion diced
  • 1 leek diced
  • 1 tbsp flour
  • 1 cup white wine
  • 5 cups of chicken stock
  • 1 tsp salt (to sweat the mushrooms)
  • 2-3 tbsp heavy cream
  • sea salt & coarse black pepper to taste

Directions:

  1. slice the button mushrooms, and diced the yellow onion & leek.
  2. caramelise the mushrooms in a soup pot with 1 teaspoon salt in high then medium heat. add the yellow onion and leek & cook until they soften. take out some caramelised mushrooms for toppings if you like. add a tablespoon of flour to thicken. add 1 cup of white wine and reduce, and add 3 cups of chicken stock. bring to boil & then turn fire to low & cook for 1.5hrs. let the soup cool or add more cold chicken stock or water, then blend it in a blender in batches. bring the blended soup to boil adding stock or water as necessary to taste according to your own preference. turn fire to low and add 2 tablespoon of heavy cream and mix well. serve with dash of extra virgin olive oil & caramelised mushroom toppings.

Recipe = Pistachio Crusted Rack of Lamb

Image

pistachio crusted rack of lamb

never cook lamb before. always had the impression that it was terribly hard! unlike a beef steak which you can just throw in the pan, lamb is like “who can cook lamb?” – unknown, undoable..

in fact, when eating out, I hardly ever order beef, since I can make a rather good steak myself with no effort & at fraction of the cost (just like I will only order squid-ink pasta since it is about the only pasta I don’t make myself); so its lamb or fish everytime (dining out) except at some famous grills, Japanese or fine dining restaurants..

I have a friend though always posting lamb pictures & obsessed with meat thermometers (which I now have 2 thanks to this friend for one, and still have not used any!) Well, I only started cooking much since March2012, so thermometers will have a future with me, I think..

so I gotten myself this packet of lamb, which contained 2 frenched lamb racks, and on the first occasion when enough guinea pigs volunteered to dine at my place, I gave it a go and cooked my first ever lamb rack.  I always like Foodwishes.com Chef John’s cooking videos, and this pistachio crusted rack of lamb recipe is no exception. It is really very easy to make, much easier than the 2-hr slow-cooked Spanish beef ribs which requires preparations & cooking for the vegetable ratatouille for sauce & garnishing.

So I seasoned & browned the lamb rack, prepared the pistachio & the mix (add breadcrumbs, olive oil, melted butter) for the crust, rubbed dijon mustard on the lamb rack so that the pistachio crust sticked, and when my friends were here, while we were devouring the other dishes, I just put the lamb rack into a 210degC oven for 23minutes; and voila, I had a very impressive-looking & tasty pistachio crusted lamb which everyone really enjoyed! actually it was medium & I would have preferred medium rare, will try 21-22minutes next time.

pistachio crusted rack of lamb

pistachio crusted rack of lamb

pistachio crusted 1/2rack of lamb

pistachio crusted 1/2rack of lamb updated on 22.1.2015

Looks like I won’t be eating lamb anytime soon when dining out.

c.h.e.f andy

Ingredients:

  • 1 frenched lamb rack (standard 8 ribs, about 600g, good for 4)
  • 1 cup of pistachios
  • 2 tbsp breadcrumbs
  • 1 tbsp melted butter
  • 1 tbsp olive oil
  • sea salt & coarse black pepper to taste
  • 2 tbsp dijon mustard

Directions:

  1. Prepare the lamb rack – cut/trim away the fat (to reduce the strong gamey taste/smell), cut about 2cm every 2 ribs w/o cutting into the loin (this for easy serving of the lamb rack afterwards), season with sea salt & coarse black pepper & pan seared including the ends over a very hot pan. put aside on an aluminium lined baking tray & reserve.
  2. Prepare the pistachio crust mix – cut about 1 cup of toasted pistachios into small bits. in a large bowl add 2 tablespoons breadcrumbs, 1 tablespoon olive oil & 1 tablespoon melted butter, & mix.
  3. Cook the lamb – coat the lamb loin with 2 tablespoon of dijon mustard. This will enable the pistachio crust to stick. now coat the pistachio mix on the lamb to form a crust. Preheat oven to 210degC and place the lamb in the oven for 22minutes (or longer if you like it more done). serve

Korean Spicy Sotong (Squid) Salad

Image

Korean spicy sotong (squid) salad

was rummaging through my fridge one day and saw this bottle of gojuchang (a savoury and pungent Korean fermented red pepper paste) – see picture below. I must have bought that months ago from a Korean provision shop. It is supposedly such an indispensable universal seasoning condiment – and I do often take it at Korean restaurants eg for bibimbap (a signature Korean dish-a bowl of warm rice topped with seasoned sauteed mixed vegetables usually with a raw egg & beef) – but it seems that I have found no use for it.

gojuchang - Korean fermented red pepper paste

gojuchang – Korean fermented red pepper paste

I googled the internet and chanced on this Korean Spicy Squid Salad Recipe. I tried it, and it was easy to do & good. I didn’t have watercress & cucumbers so I used what I had in the fridge – kang kong, celery and bean sprouts, and it turned out rather well, as seen in the above picture – my first & only attempt so far! 🙂

The bean sprouts & kang kong were just blanched, with the latter squeezed dry on a sieve to remove excess water as shown in the video. The celery & yellow onions I thought needed some sautee-ing, which I did to soften, and they turned out very well indeed.

After that it was just a matter of adding & mixing gojuchang & other seasoning. It made for a very refreshing & nice salad, a pleasant addition to dinner. 🙂

c.h.e.f andy

Ingredients:

  • 1 large squid (250g) skin, wings & head removed
  • 1 stalk of celery cut 2cm size
  • 1/2 yellow onion diced
  • 1/2 a bunch of kang kong
  • a handful of bean sprouts

Seasoning mix:

  • 2.5 tbsp gojuchang Korean red pepper paste
  • 2 tsp red wine vinegar
  • 1 tbsp sugar
  • 1 tsp minced garlic
  • 1 tsp sesame oil
  • sea salt to taste

Directions:

  1. Prepare the squid – remove the head, wings & red skin. cut open the squid length-wise. for the chequered pattern cut, slice length-wise along squid 1/4in apart, careful not to cut through. then cut the squid in 1/2 length-wise. now slice across & cut through the squid every 4th cut – that will produce a 1in width cut with square-cut patterns.
  2. Make the salad – blanched the bean sprouts & the kang kong & squeeze out excess water from the kang kong by placing on a sieve. sauteed the celery & yellow onions. Cooked the squid in boiling water for 4minutes until cooked. In a large bowl, mix everything together – the squid, vegetables & the seasoning mix. serve.

What’s Cooking?

Couple of my friends cannot take certain food. One cannot take beef, another has intolerance to animal fat.

When I invite them for home makans (meals), I will plan before hand – like replaced the beef with GR (Gordon Ramsay) crispy salmon once previously, which I then proceeded to dish out an undercooked version no thanks to another friend buzzing in my ears offering unsolicited coaching. 🙂 Another time I replaced the beef with 3 pan-seared hokkaido scallops, this rather successfully. And in place of belly pork spaghetti or crab linguine in pink sauce (creamy tomatoes), I had a specially made single portion of seafood alio olio for the friend.

All my friends are by nature very “kek ki” (客气) & “automatic” – easy-going & accepting/non-demanding and not wanting to trouble others. 🙂 I am mostly of the same disposition, I might add, hahaha…

For myself as the person cooking, the perspective though is somewhat different. I understand now that I cook, that it is not about the thing you cook but about what makes your guests (family or friends) enjoy the food & relax & make that a memorable experience for everyone, that is important. So the person cooking will naturally want to find out what the guests need, and to plan the meal accordingly. It would not make sense for someone to cook (however special he might think the food to be) which did not suit the guests’ palette – the whole exercise would be quite meaningless. So it is no trouble at all to find out, and to plan accordingly!

I am sure it must be true though it still sounds corny to me that great dishes only come with love in the heart (from Korean soap operas) 🙂 but I know for sure that cooking is most fun when you turn out a nice dish according to plan (which is itself most pleasurable) or be it pleasantly surprised; and those sharing it truly enjoy it!

One thing I realised after I started cooking (which is not so long ago) is the importance of planning – I guess like all things else! And if you plan & get the things together & the sequences right, everything come together “magically” and you won’t be stressed, distressed & dis-oriented!

Here’s for more stressless, fun cooking, eating & hanging out!

c.h.e.f andy

Incredible Value Dinner @ Taoheung Carnavorn Road Tsimshatsui on 11Mar2013

DSCN4149

Taoheung group is my favourite restaurant group in Hong Kong. I specially like the set meals at Ying (迎) at Nathan Road and at Chung Cuisine (锺菜) at Times Square Causeway Bay.

They have ongoing promotions, and we managed to book a table for 3pax at Taohueng @ Carnavorn Road Tsimshatsui during our recent visit (they will NOT accept table booking on the same day but you can go at 6pm OR 9pm to queue up for the dinner OR supper promotions – they even have an electronic colour-coded queue system for 2pax, 3-4pax, 5-6pax, 7-8pax etc, more sophisticated than the banks..lol..). 🙂

There was NO service to talk about here (well at least for the 1/2hr starting from 6pm where there seemed to be orderly mayhem!). I had tried previously another of their restaurants Pier 88 (稻香超級漁港) during the promotion hour and to their credit service there was ok despite the mad rush at 6pm.

We had the incredible value promotion in the picture above=HK$99 for a steamed live garoupa (I estimated about 700g-800g) PLUS a platter comprising suckling pig, roast duck, char siew & soy chicken! 🙂 The normal price for the tiger garoupa alone (w/o promotion) was HK$238!

The steamed garoupa was very good, which was like “routine” in Hong Kong.

Image

steamed live tiger garoupa

The suckling pig platter – what can I say? every item was very good even including the black fungus, which was crunchy with a touch of sesame oil. Not sure the normal price for such a platter, but I would gladly pay HK$99 or more for the platter alone.

platter=suckling pig, roast duck, char siu, soy chicken

platter=suckling pig, roast duck, char siew, soy chicken

You kind of “have to” order 例汤 (soup of the day) when in a cantonese restaurant in Hong Kong, so we dutifully ordered one on the menu=chicken & fish maw (花膠) soup. It was a big pot costing HK$108. It was good but NOT great! Auntie Bes can make just as good soup at home. The one we had at Lei Garden (利苑) Time Square – which is famous for its soup – the day before, a smaller pot at HK$88 was by far the better.

Image

& when in Hong Kong, you “have to” order vegetables. We had choy sum with moi choy (梅菜菜心). It was wonderful! 🙂

Image

choy sum with moi choy (梅菜菜心)

The very satisfying dinner for 3 of us came to HK$331 (which already included 10% service charge), like S$53 nett! I can certainly do this every time. 🙂

c.h.e.f. andy

The Clan Restaurant @ Bukit Pasoh Singapore on 8Mar2013

had a great lunch with my daughter at The Clan Restaurant at Bukit Pasoh. We had the 5-course set lunch.

This my second time here – I was here with wife 3 weeks back. We both liked the food. The Chef, Ken Teo, was formerly the Executive Chef of Dozo, and we have always liked Dozo’s food. The price of the 5-course lunch, S$42.80 (6-course dinner S$63.80), is slightly higher than Dozo (& w/0 the cooler drink), but I think overall the food quality is better. There are 5 choices of appetizer & dessert, 4 choices of soup & 6 choices of main course.

I suppose the name has got to do with its location at the premises of The Gan Clan Association. Bukit Pasoh locale is home to a good few top restaurants like Majestic, Oso and nearby at Kiong Siak Street – Ember, Nicolas Le & Bistro Soori. The food is I guess nothing “Clanish”, being in the modern european genre similar to Dozo with touch of Japanese fusion – perhaps there is a new “Clan” there slowly in the making. 🙂

just like Dozo, we started with a nice thirst quencher.

The Chef Starter is a trio comprising duck rillette, pan-seared scallop with lots of foam (this is very good & definitely better than Dozo) and a salmon mouche cone (Dozo serves a smoked salmon, tiny pan-seared piece of foie gras & pan-seared scallop).

Image

duck rillette, salmon mouche cone, pan-seared scallope with foam, thirst quencher

Next we had a choice of appetizer. I had the bamboo clam. This was really very good. the clam was very sweet & bouncy fresh, and the ikura (salmon roe) flavour & saltiness combined very well with the shellfish texture indeed. daughter had the deep-fried foie gras, which was not a common preparation. I stole a bite. It was different & quite good, not sure it would become popular enough to be avant garde but unlikely to displace the all-time favourite pan-seared caramelised foie gras anytime soon. In terms of quality, quantity & presentation, both these appetizer choices certainly qualified as appetizers in a 3-course lunch in a fine-dining restaurant, nevermind a 5-course lunch priced at S$35++pax after 15% discount.

Image

bamboo clam with ikura, deepfried foie gras

Next up is the soup. I had the cepes mushroom bisque. It was very good, maybe slightly more quantity-wise but not much different from Dozo. daughter had the crab bisque which came with a prawn twister. I think this had a lot more foam than that served at Dozo & was overall better.

Image

cepes mushroom soup, crab bisque with prawn twister

Next came the 48hr beef short ribs served on hoba leaf on a lava stone. I really, really loved this dish. The quality of the beef was much superior to that at Dozo. The meat was just so sweet & flavourful & the texture was just super.

Image

48hrs beef short ribs

For the dessert choice, daughter had the chocolate lava cake. It was good but daughter thought it was no better than the one I made at home and perhaps my 70% cocoa chocolate flavour was indeed better. I had the 4-cheese platter-good stuff!

Image

chocolate lava cake, 4-cheese platter

Overall, it made for an extremely satisfying meal. 🙂

c.h.e.f andy

Oven Grilled “Sotong” (Squid)

oven grilled "sotong" (squid)

oven grilled “sotong” (squid)

I always enjoyed ika sugatayaki (grilled whole squid) at Japanese Izakaya  – 居酒屋 (though since I do not drink much I seldom visit Izakaya c/w very many other styles of Japanese food which I love).

I was trying to find out how to do this as squid has lots of water & you end up steaming the squid instead of grilling. One way I can see is cutting the whole squid in 1/2 rings, then the water will be drained & the oven will grill & NOT just boil or bake the squid. I found a very nice Izakaya picture here.

I also found a simple way of cutting the 1/2 rings. It is described here in Jamie Oliver’s recipe. You insert a knife flat into a large (250g) squid, then using another knife you cut the squid as if you are cutting it into rings. the knife stop at the surface flat of the inserted knife so you get your 1/2 rings. This way it is also easy to wash & remove the insides of the squid.

oven grilled "sotong" (squid)

oven grilled “sotong” (squid)

I then line a baking tray with aluminium foil, place the dry squid & head (air-dry in fridge OR with kitchen towels) on it, sprinkle ground sea salt & coarse black pepper, & drizzle lime juice, olive oil & 1 teaspoon of light soy sauce. I place the baking tray in a preheated 210degC oven turned to the grill function for 10minutes, remove the squid and spooned out the sauce to a small bowl. I turn the squid over and return to the oven for another 8 minutes. Then I transfer to a serving board, and serve with the sauce as dip (as in the picture above).

c.h.e.f andy

Spicy Vongole Fettucine with White Wine

Image

spicy vongole fettucine with white wine

I bought “la la” (littleneck clams – see here for interesting write-up about littleneck, topneck clams etc) from Sheng Shiong today. I have never cooked vongole before but since I do pretty ok in the pasta department, I thought I give it a go. Here comes my first vongole! 🙂

There’s only my eldest daughter Su Min at home for dinner, so I cooked just enough vongole fettucine for 2 of us, PLUS trying out a grilled sotong (squid) recipe.

My preferred pasta is spaghetti but since there is an opened yet unfinished packet of fettucine, I used that instead.  I did the usual browning of peeled garlic cloves in olive oil over low fire and soaked in the aroma. I then emptied the olive oil & browned garlic into a bowl. I added some salt & oil to water in a sauce pan and bring it to boil and put a bunch of (say 200g) fettucine in the boiling water for 11 minutes according to the timing instructions. I tested the texture to make sure it is just al dente & transferred the fettucine to a colander & set aside. In the pan still greased with olive oil I added 15g butter & threw in cut chilli padi & cut spring onions (green onions). I transferred the bowl of olive oil with browned garlic back into the pan. I then turned the fire high & put in the clams. Next I added 1.5 cups of white wine & 1 teaspoon sugar, cover the pan & let it reduced for few minutes. The clams opened up when cooked. I added the fettucine, turned off the fire, tossed and added sea salt to taste.

Image

spicy vongole fettucine with white wine

The shellfish broth, sweetness of the white wine, fragrance of garlic & olive oil, & the spicy kick from the chilli padi all combined very nicely to make this a very tasty dish.

c.h.e.f andy

Ingredients:

  • 200g fettucine (or liguine or spaghetti)
  • 700g littleneck clams
  • 15g butter
  • 3 stalks spring onions chopped
  • 1-2 chilli padi
  • 4 tbsp olive oil
  • 1 whole bulb of peeled garlic cloves
  • 1.5 cups white wine
  • 1 tsp sugar OR to taste
  • sea salt to taste

Directions:

  • Prepare the pasta – add salt & oil to water in a saucepan & bring to boil. add fettucine and boil according to timing instructions. test to make sure the pasta is just al dente & empty into colander & set aside.
  • Cook the vongole pasta – brown whole bulb of peeled garlic cloves in olive oil in a pan over low heat. empty oil & garlic into a bowl. add butter to the pan & throw in cut spring onions & cut chilli padi. add the clams, turn up the fire, add the white wine & sugar, cover while the clams cook. The clams will open up when cooked. add in the fettucine, turn off the fire, toss & add sea salt to taste. serve.

Skin-on Pan-roasted Brined Duck Breast

pan-roasted brined duck breast with wingstick

pan-roasted brined duck breast with wingstick

My success in brining chicken & the pan-roasted brined chicken breast recipe did much to encourage me. 🙂 Also, one friend. in particular, has been egging me to make duck a l’orange but I was NOT excited over a nice orange sauce but not-so-great duck breast as the main fare!

So I thought I should at least try brining duck since it works so well on chicken. And my, my, did it work well! My daughter Su Lin just loves the duck breast. It is moist, tender and tasty from the brining and the slow cooking.

skin-on pan-roasted brined duck breast

skin-on pan-roasted brined duck breast

First, I brine the duck breast & drumstick in 1 litre water with 3 tablespoon salt, 2 tablespoon sugar and 5 limes (squeezed) for 24 hrs. I then wash thoroughly in slow running water, and place them on a rack & air-dry for 24hrs in the fridge (you can just use a kitchen tower to dry them instead). Before cooking, I take the duck out of the fridge for at east 1/2hr to get it to room temperature. I then place them on a cold non-stick pan & turn on the fire to low, and leave w/o turning for 10 minutes. This will render out the fat & make the skin crispy (as in the 2 pictures above). 🙂 I then turn over the duck, spoon out the fat, and then turn off the fire.

skin-on pan-roasted brined duck drumstick

skin-on pan-roasted brined duck drumstick

I was experimenting with 2 different cooking methods so I kept the duck breast in the oven-proof pan & removed the duck drumstick & put it is a separate baking dish.

  1. For the duck drumstick, I tried the pan-roasted brined chicken recipe & place the duck skin-down on the baking dish and place it in the oven preheated to 250degC for 10minutes. I then remove it from the baking dish, let it rest on a serving board, and then carve & serve. It was very good BUT the slow-cooked duck breast which came after was even better!
  2. For the duck breast, I tried Foodwishes.com chef John’s prime rib method (on the duck instead of prime rib). estimating my duck drumstick to be <400g, I did 4minutes on 250degC, left the duck in the oven w/o opening the oven door, and set the timer to 45minutes. there was no need to rest the duck as it had already been rested for 45minutes, and voila! this was easily 1 of the best duck breast I had, even when c/w good restaurants.

c.h.e.f andy

Ingredients:

  • 2xduck breasts with wingstick (I use a 1.9kg to 2.1kg duck from Shop n Save or Giant Hyspermarket)
  • 1 litre water
  • 5% salt (about 50g)
  • 3% sugar (about 30g)
  • 5 limes (or about 30ml bottled lime juice)

Directions:

  1. Preparing the duck breasts with wingstick – use kitchen scissors to cut chicken in 1/2, then cut around the drumstick into 1/4 (breast with wingstick & drumstick quarters) – use a heavy knife or chopper if required,  then cut away & remove the bones under the breast completely, then cut away the fat, wash & clean.
  2. Brining – add 1 litre water in a large plastic container, mix in about 3 heap tablespoon salt & 2 heap tablespoon sugar & stir to dissolve, then pour in 30ml bottled lime juice or squeeze juice from about 5 limes. Put 2x cleaned duck breasts with wingstick into the container and place container in fridge for 24hours. Remove & wash duck breasts thoroughly in slow running water & place on a rack to air-dry in fridge for 24hrs (can also skip this step & dry with kitchen towels)
  3. Cooking – Remove duck breasts from fridge & leave it at room temperature for at least 1/2hr. Place the duck breasts skin-down in a COLD oven-proof non-stick pan. turn the fire on and to low & fry for 10minutes to render out the fat and get a crispy skin. The oil will sputter a bit, turn to low heat after 1 minute. Preheat oven to 250degC. Place oven-proof pan in oven & let the duck cook for 4minutes. Leave the duck in the oven w/o opening the oven door and set the timer to 45minutes and let the duck slow-cook in the residual heat. Remove duck from oven & serve.

Duck in Orange Sauce

Image

2 of my friends who joined me a few times for dinner do not take beef, so I was seeking couple stand-in dishes like pan seared hokkaido scallops (which I didn’t do well previously because I had then no notion yet of the simple logic of a very hot non-stick pan & bone dry scallops), and GR (Gordon Ramsay) crispy salmon which I do rather well. And so I googled and found this videojug’s Duck in Orange Sauce recipe.

This recipe is good for making the orange sauce. For better instructions on panfrying the duck, I prefer Gordon Ramsay’s cold pan method to render out the fat & produce a crispy skin.  The recipe worked well enough for my first try as you can see in the above picture. However I do not find the breast tender enough and thought that slow braising in the orange sauce or in the oven may work better.

Well, slow braising didn’t work well enough, and the slow cooking in the oven also did not work too well until I apply/vary the pan-roasted chicken method on brined duck drumstick, and also adapted/tested out Foodwishes.com chef John’s prime rib method on the brined duck breast. Both these latter 2 methods produced very nice duck drumstick & duck breast, with the prime rib method on brined duck breast producing a very tender, moist & tasty duck breast which can be serve as a standalone tapas OR serve as a main course drizzled with the orange sauce. see here.

c.h.e.f andy

Ingredients:

  • 2 duck breasts (the duck size I use is a smallish 1.9kg to 2.1kg for a whole duck)
  • sea salt & coarse black pepper
  • 2 tbsp light soy sauce
  • 150ml fresh orange juice
  • 1 cup wine
  • 1 cup chicken stock
  • zest from 1 orange
  • 2 tbsp sugar

Directions;

  1. combine the orange juice, zest, wine & chicken stock in a saucepan. heat & reduce and set aside.
  2. lightly season the duck breast with sea salt & coarse black pepper (now I use the brined duck method which have the duck breasts brined in 1 litre water with 5% salt & 3% sugar for 24hrs, so I do not season before putting to the pan).
  3. place the duck breasts in a cold pan & turn on the fire & to low. allow the fat to be slowly rendered out and leave for 10mins w/o turning to get a crispy skin(watch Gordon Ramsay’s video on how to do this). turn over the duck, spoon out the duck fat and add 2 tablespoon of soy sauce. turn off the fire.
  4. using Foodwishes.com chef John’s prime rib method, I preheat oven to 250degC, then turn over the duck back to skin-down on the oven-proof pan & place it in the oven for 4minutes! leave the duck breast in the oven w/o opening the oven door & turn the timer to 45mins to let the residual heat can slow cook the duck. After 45 minutes remove the duck from the oven, rest & serve standalone as a tapas OR as a main course drizzled with orange sauce. see here.

Nonya Curry Chicken

nonya curry chicken

nonya curry chicken

I just love the nasi padang dishes from Nasi Padang River Valley located at Zion Road. There was a time we even used to lug too many takeaway items for small home gatherings, asked for lots of curry sauce and reused later by adding our own chicken from the supermarket. That was a time when calories & cholesterol did not enter the calculations.

Image

nonya curry chicken

Anyway I didn’t think I could cook curries or had any interest to, until I came across this nonya curry chicken recipe & decided to just give it a try – WTH right?

Blessed with beginner’s luck, I got it right the first time, and was able to repeat with no difficulty the second try. I still don’t cook this often, but I have done it 2 more times for the 23pax buffet on 26nov2012 & just before that a 10pax sit-down dinner on 5nov2012, and all were great & I just love the lemak & herb taste. I would be quite happy to cook this again when I need. 🙂

First I stir-fry star anise, cinnamon stick & cloves over low heat. I then add in the spice paste (ground garlic, shallots, chilli padi, coriander seeds, cumin, fennel) and stir-fry till fragrant. then in goes the curry leaves and cut chicken pieces and fry them really well. I then add water, cover with lid, and braise over low heat for 40minutes OR until chicken is cooked. After 10mins, I use a pair of tongs to pick out the chicken breasts & place them on top of the thighs, wings, drumsticks and pieces with bones so they won’t be overcooked and remain tender & juicy. 🙂 Finally I add about 100ml coconut for the lemak taste I like & a teaspoon of tumeric to give it the nice golden yellow colour. how pretty! 🙂

nonya curry chicken

nonya curry chicken

nonya curry chicken

nonya curry chicken

I then add sea salt and sugar to taste and serve.

c.h.e.f andy

Ingredients:

  • 1 whole chicken (I use 1.4kg from Giant hypermarket OR Sheng Shiong) – cut off head, neck, feet & cut into 2in pieces
  • 100ml – 150ml thick coconut milk or to taste
  • 2 star anise
  • 1 clove
  • 1 cinnamon stick
  • 4 tbsp oil
  • 1 tbsp sea salt
  • 1 tbsp sugar

for spice paste (ground – in my case I mince & pound them):

  • 3 cloves garlic
  • 10 shallots
  • 2 chilli padi
  • 10g coriander seeds
  • 1 tsp fennel
  • 2 tsp cumin
  • 1 tsp tumeric powder

Directions:

  1. Prepare the chicken – with a pair of kitchen scissors, cut off the head and feet. cut the body in 1/2 & the cut out the drumstick, thighs & wings along the joints. chopped the breasts & remaining portions into 2 in pieces.
  2. Cook the chicken curry – stir-fry star anise, cinnamon stick & cloves over low heat. add in the spice paste and stir-fry till fragrant. add the curry leaves and cut chicken pieces and fry them really well. add water, cover with lid, and braise over low heat for 40minutes OR until chicken is cooked.
  3. after 10mins, use a pair of tongs to pick out the chicken breasts & rest them above the curry liquid on pieces with bones etc so they won’t be overcooked and remain tender & juicy. add about 100ml coconut for the lemak taste & a teaspoon tumeric powder for the colour. add salt & sugar to taste. serve.


Teochew Braised Duck


teochew braised duck

teochew braised duck

teochew briased duck

teochew briased duck

Now for some Asian cuisine.

Being Teochew (a dialect group from South China at the eastern side of Guangdong province), I am of course a fan of Teochew braised goose (潮州鲁鹅). Unlike Hong Kong, we don’t get much of goose in Singapore, so we settle for the second best aka braised duck. Like the popular Hainanese chicken rice, though perhaps a distant second, braised duck rice is available in hawker centre & food courts all over Singapore & quite cheaply, so there is not that much motivation really (according to my “worthwhile to do or not” philosophy) to attempt Hainanese chicken rice or teochew braised duck unless I can do this easily and produce something of equal or better standard than most I can get easily & cheaply outside.

Well, I have NOT found it yet for chicken rice, BUT I might just have got it for my braised duck!

Tai Wah chicken marinate (大华鲁鸡汁)

Tai Wah chicken marinate (大华鲁鸡汁)

This really a very simple recipe, as all I am doing is like using Tai Wah chicken marinate (大华鲁鸡汁) I bought for S$2.60 at Giant hypermarket, add an entire bulb of peeled garlic cloves (for 1/2 a duck – you can of course use the whole duck if you like, for me I only do 1/duck as my family cannot finish 1 duck & my group dinners include many other dishes so I also do not want to cook 1 whole duck which I did only on the occasion of the 22pax home buffet on 5.5.2013 and 27pax 11-course home buffet on 7.11.2013), cinnamon sticks, star anise and bay leaves, and braise for 1 hour. voila!

20130301_150335

Teochew braised duck

teochew braised duck

teochew braised duck

Not much of a recipe really, but my cooking philosophy is always driven by taste (& of course texture & colour, presentation – in Chinese we say 色香味OR colour, fragrance & taste) – so I am no stickler to whether to cook something with herbs from scratch like I do for nonya curry chicken OR to use a premix as I do often for my favourite, favourite dish – bakuteh (肉骨茶). So long as my diners and I like it, and it is easy to make & repeatable, I am all for it irrespective whether it is done from scratch or with premix! 🙂

One thing I am clearly NOT good at is deboning the duck, as seen in the picture of the largely mutilated carcase below. 🙂

teochew braised duck deboned

teochew braised duck deboned

c.h.e.f andy

Ingredients:

  • 1/2 duck (about 1.9kg to 2.1kg for whole duck size)
  • 1 cup Tai Wah braised chicken marinate
  • 1.5 – 2 tbsp of sugar
  • 1 whole bulb of peeled garlic cloves
  • 2 cinnamon sticks
  • 2 star anise
  • 1 bay leaf

Directions:

  1. Prepare the duck –  use kitchen scissors to cut off the neck & the feet. cut through the body in 1/2. use a heavy knife or chopper if required. wash, clean & dry with kitchen towels.
  2. Cooking the duck – rub the 1/2 duck with sugar all over the skin side & the inside. In a large wok, stir fry the peeled garlic cloves to brown over low/medium heat, and add star anise, cinnamon sticks & continue to stir-fry until you can feel the aroma. turn to medium & place the duck skin down and using your hands, push the skin onto the wok surface to brown a little for 5 minutes. turn heat to high & add 1 cup of Tai Wah braising sauce and 3 cups of water enough to cover 80% of the 1/2 duck. bring to boil, cover with glass lid & lower fire to minimum and braise for 1 hr. The braising liquid should continue frothing a little & nearly cover the 1/2duck. use a ladle & base the duck with the braising liquid every 15minutes. remove duck from wok & place on a cutting board to rest. empty the sauce (through a strainer if required) into a bowl. lift off the thick layers of oil. The sauce can of course be used to cook eggs & beancurd.
  3. Serving the duck – I debone the duck & place in a serving dish w/o basing the sauce over. I keep the sauce in a bowl next to the serving dish so the dinners can use the sauce as dip if they prefer.